
Solo Miner LCD WatchDog is a dedicated external TFT LCD monitoring screen designed for Home Miners. Single-click to cycle through mining device info, double-click to go back, plus batch management of miner settings, real-time BTC price, and more.To centrally manage Bitaxe, Nerdaxe, Zyber, and other Solo Miners on the same LAN, TCH engineers developed the proprietary ZCube OS backend — just configure the network and flash the firmware to start monitoring! This complete guide walks you through everything about WatchDog, from network setup to live monitoring data. More cool features await your discovery…
1. Quick Overview of WatchDog
WatchDog is the first unified external, detachable monitoring screen launched by TinyChipHub Labs, built to manage Bitaxe, Nerd, Zyber OS, and related systems under one roof. Think of it as a dedicated dashboard for your small-form-factor miners. At the same time, using WatchDog gives you early access to parts of the new Zyber Blanc BM1373 Solo Miner feature set paired with Zyber OS. Unlike a bare-bones BTC Miner display, it acts more like an overseer — or your butler — that manages all your miners in one place.
1.1 WatchDog Feature Snapshot
WatchDog connects to your local network via Wi-Fi and automatically scans & aggregates runtime data from Bitaxe, Nerdaxe, Zyber, and other compatible crypto-mining devices on the same network — pushing hashrate, power draw, temperature, and real-time BTC price onto a single independent screen. Say goodbye to constantly switching browser tabs and backend windows. The top is crowned with a cubic beam-splitter prism for floating projection — pure sci-fi aesthetic. Interaction ditches physical buttons entirely: a built-in vibration sensor means you control everything with taps. Core highlight: the ZCube OS backend lets you batch-manage all miner data and settings from one place, inside TCH's independent management ecosystem. You can also jump straight into any individual miner's backend — no more memorizing IP addresses.
- Screen: TFT LCD with a cubic beam-splitter prism delivering a standalone 3D floating display effect;
- Interaction: Vibration sensing (single tap = cycle forward / double tap = go back); auto-standby after 10 min idle;
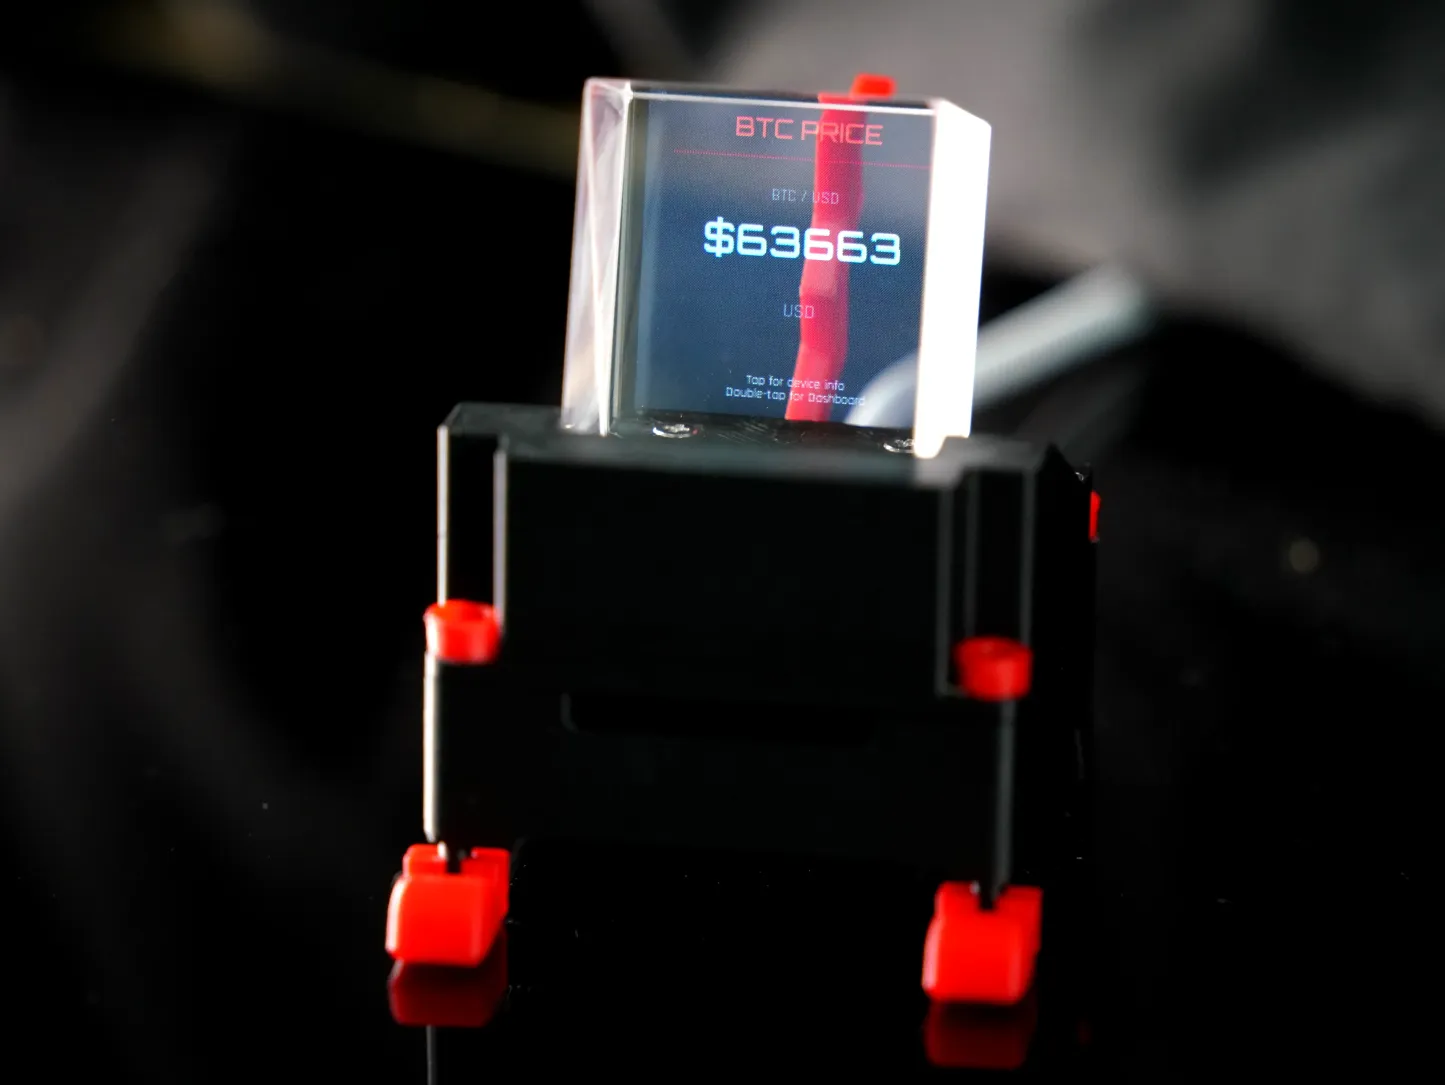
- Four Display Pages: Standby Clock (time & date) → BTC/USD Real-Time Price → Total/Single Miner Dashboard (total hashrate, total power, Best Diff, device count) — with more pages coming in future updates…
- Compatible Devices: Full support for Bitaxe (Axe OS) / Nerdaxe (Nerd OS) / Zyber (Zyber OS) families;
- Dedicated Backend: ZCube OS Web UI — centralized Dashboard visualization, System status, Batch Setting for bulk config, Update tools, and more…
- Power: USB 5V powered, charging cable included — once Wi-Fi + firmware are set, it's plug-and-play.
1.2 What is Solo Miner LCD WatchDog
We previously published a dedicated article on TinyChipHub's News section explaining in detail: What is WatchDog? An Independent Multi-System Miner Monitor, Decoupled from Your ASIC Miner! That piece also covers the underlying principles — worth a read if you want the deep dive (quick recap below).
(⏰ Note: All data should be taken against the latest system and device versions. The earlier article covered v1; the current iteration has gone through multiple stable upgrades — safer, smoother, and more capable!)
🔥 Most LCD accessories on the market lock you into one firmware ecosystem — swap miners and the screen becomes a paperweight. WatchDog brings three major backends — AxeOS, Nerd OS, and Zyber OS — under one roof, so one screen covers them all. Meanwhile, WatchDog's firmware is maintained by TinyChipHub, supports wireless (OTA) updates, and the latest version can be found in the GitHub code repository.
WatchDog is NOT the same category as an ASIC miner like Zyber 8G Premium — it is a multi-system miner monitor completely independent of any individual ASIC. The 30×30×30 mm cubic beam-splitter prism uses a unique refraction principle to create a stunning "3D floating display" effect — images appear suspended in mid-air. Clear viewing angle, zero direct glare, comfortable even during long sessions.
For the small-scale home miner, this is currently the cheapest and most stable "visual operations entry point" — set it up once and stop worrying about it.
1.3 OLED / Graphical Screen? Spare Phone? External Monitor?
If that question crossed your mind, check this article: Which to Choose: Bitaxe OLED or Solo Miner LCD WatchDog?. Or skim the summary below — here's how it stacks up against the market:
Most competing products offer an OLED monochrome screen at best — max ~4 lines of text, zero graphical elements. Take the Bitaxe family: they use a built-in OLED (Bitaxe Replacement OLED Screen)!
Then there are higher-tier graphical screens like on the Nerd family — NerdQaxe++ has its own built-in display (LilyGo T-Display S3 Replacement Screen) that directly reflects Nerd OS monitoring UI data in real time: hashrate, temperature, efficiency ratio, etc. Those render nicer visuals and support multiple UI pages.
So you might ask — WatchDog is just a screen too, what's the big deal? Can't I just use a spare phone/iPad? Or hook up an external monitor? Run some apps and call it a day?
A spare phone/iPad, apps, or an external monitor solve the "can I see it?" problem. WatchDog solves the miner management ecosystem problem. Let's address those doubts head-on:
-
About spare phones/iPads: Running a high-power, battery-degrading, expensive general-purpose computing device 24/7 just to display miner stats — vs. a low-power, auto-updating, dirt-cheap, purpose-built instrument? That's a false equivalence. It's like asking why you don't use an iPad to mine — it misses the point entirely.
- About external monitors: Just plugging extra screens across multiple miners isn't enough! You need a proper system behind it — one you don't have to maintain yourself. Short of that, WatchDog is the cleanest choice: worry-free, efficient, and backed by the independent ZCube OS backend with true batch management!
-
About Apps: Most apps require payment and are resource-heavy. In contrast, WatchDog is completely free, runs entirely locally, and receives continuous updates without any in-app purchases. It functions as an independent relay node using LAN polling, protecting your computing power from surveillance interference.
Treat Bitaxe, NerdQaxe, or Zyber rigs like desktop art pieces and are genuinely committed to solo mining—WatchDog is your best choice.
1.4 WatchDog Hardware Breakdown & Functions
WatchDog is built from three core modules:
- 30×30×30 mm cubic beam-splitter prism — made from high-transmittance optical glass for projection clarity;
- Tilt-adjustable TFT module — the core display unit, angleable to your perfect viewing position;
- Base stand — stable support structure with integrated cable management channel and USB port.
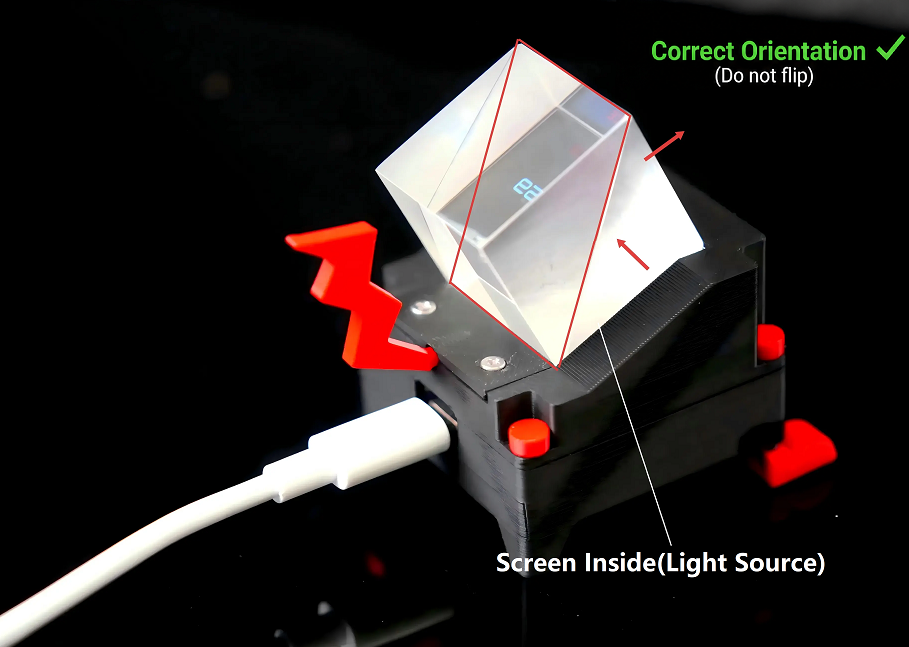
⚠️ Warning: The top cubic beam-splitter prism is glass — fragile. Please ensure the beam splitter is positioned correctly with its bevel facing down. Otherwise, the beam splitter position will need to be readjusted.
It looks like a glowing prism "digital pet" on your desk, but break it down and it delivers 3 real superpowers: real-time data display (the screen), tap-to-control interaction, and cross-system compatibility + batch management. A true multi-tool — the dedicated "dashboard" your miners deserve.
🖥️ Screen Display: Four Core Pages, Manually Cycled
- Standby Page: Shows current date (YYYY-MM-DD) and live clock; auto-returns here after 10 min idle.
- BTC Price Page: Live BTC/USD sync — data refreshes on each full network scan (≈ every 5 min).
- Dashboard — Summary View: One screen showing aggregate data for all detected miners — total hashrate, total power draw, device count, session Best Diff, etc.;
- Individual Miner Pages: Single-click cycles through each detected device, showing IP, hashrate (TH/s), power (W), temp (°C), and more… (tested: effectively no device limit)
- Additional pages in active development — got feature ideas? Hit up TinyChipHub on socials….
👆 Tap Interaction
WatchDog's built-in vibration sensor handles all input — no physical buttons, just physical taps:
| Gesture | Action |
|---|---|
| Single Tap | Cycle page / advance to next miner device |
| Double Tap | Go back |
| 10 min idle | Auto-return to Standby (clock display) |
🌐 Compatibility & Batch Management
Through ZCube OS, WatchDog auto-scans and identifies the following device types on your LAN. Multiple units can be monitored simultaneously — no per-device manual config needed:
- Bitaxe family (Axe OS-based)
- Nerdaxe family (Nerd OS-based)
- Zyber family (Zyber OS-based)
In TinyChipHub Lab testing with multiple mixed-system miners online simultaneously, WatchDog Dashboard correctly recognized and displayed. Once these devices are picked up, you can drop into ZCube OS for data monitoring and backend batch management — see the ZCube OS section below for the walkthrough.
One important note: the first time an unknown miner is seen, auto-discovery (like BTC/USD sync) can take up to ~5 minutes. But once a device has been identified, WatchDog checks/refreshes it at ~20-second intervals, so re-appearance in the backend dashboard is snappy.
2.🌐 Network Configuration (Required)
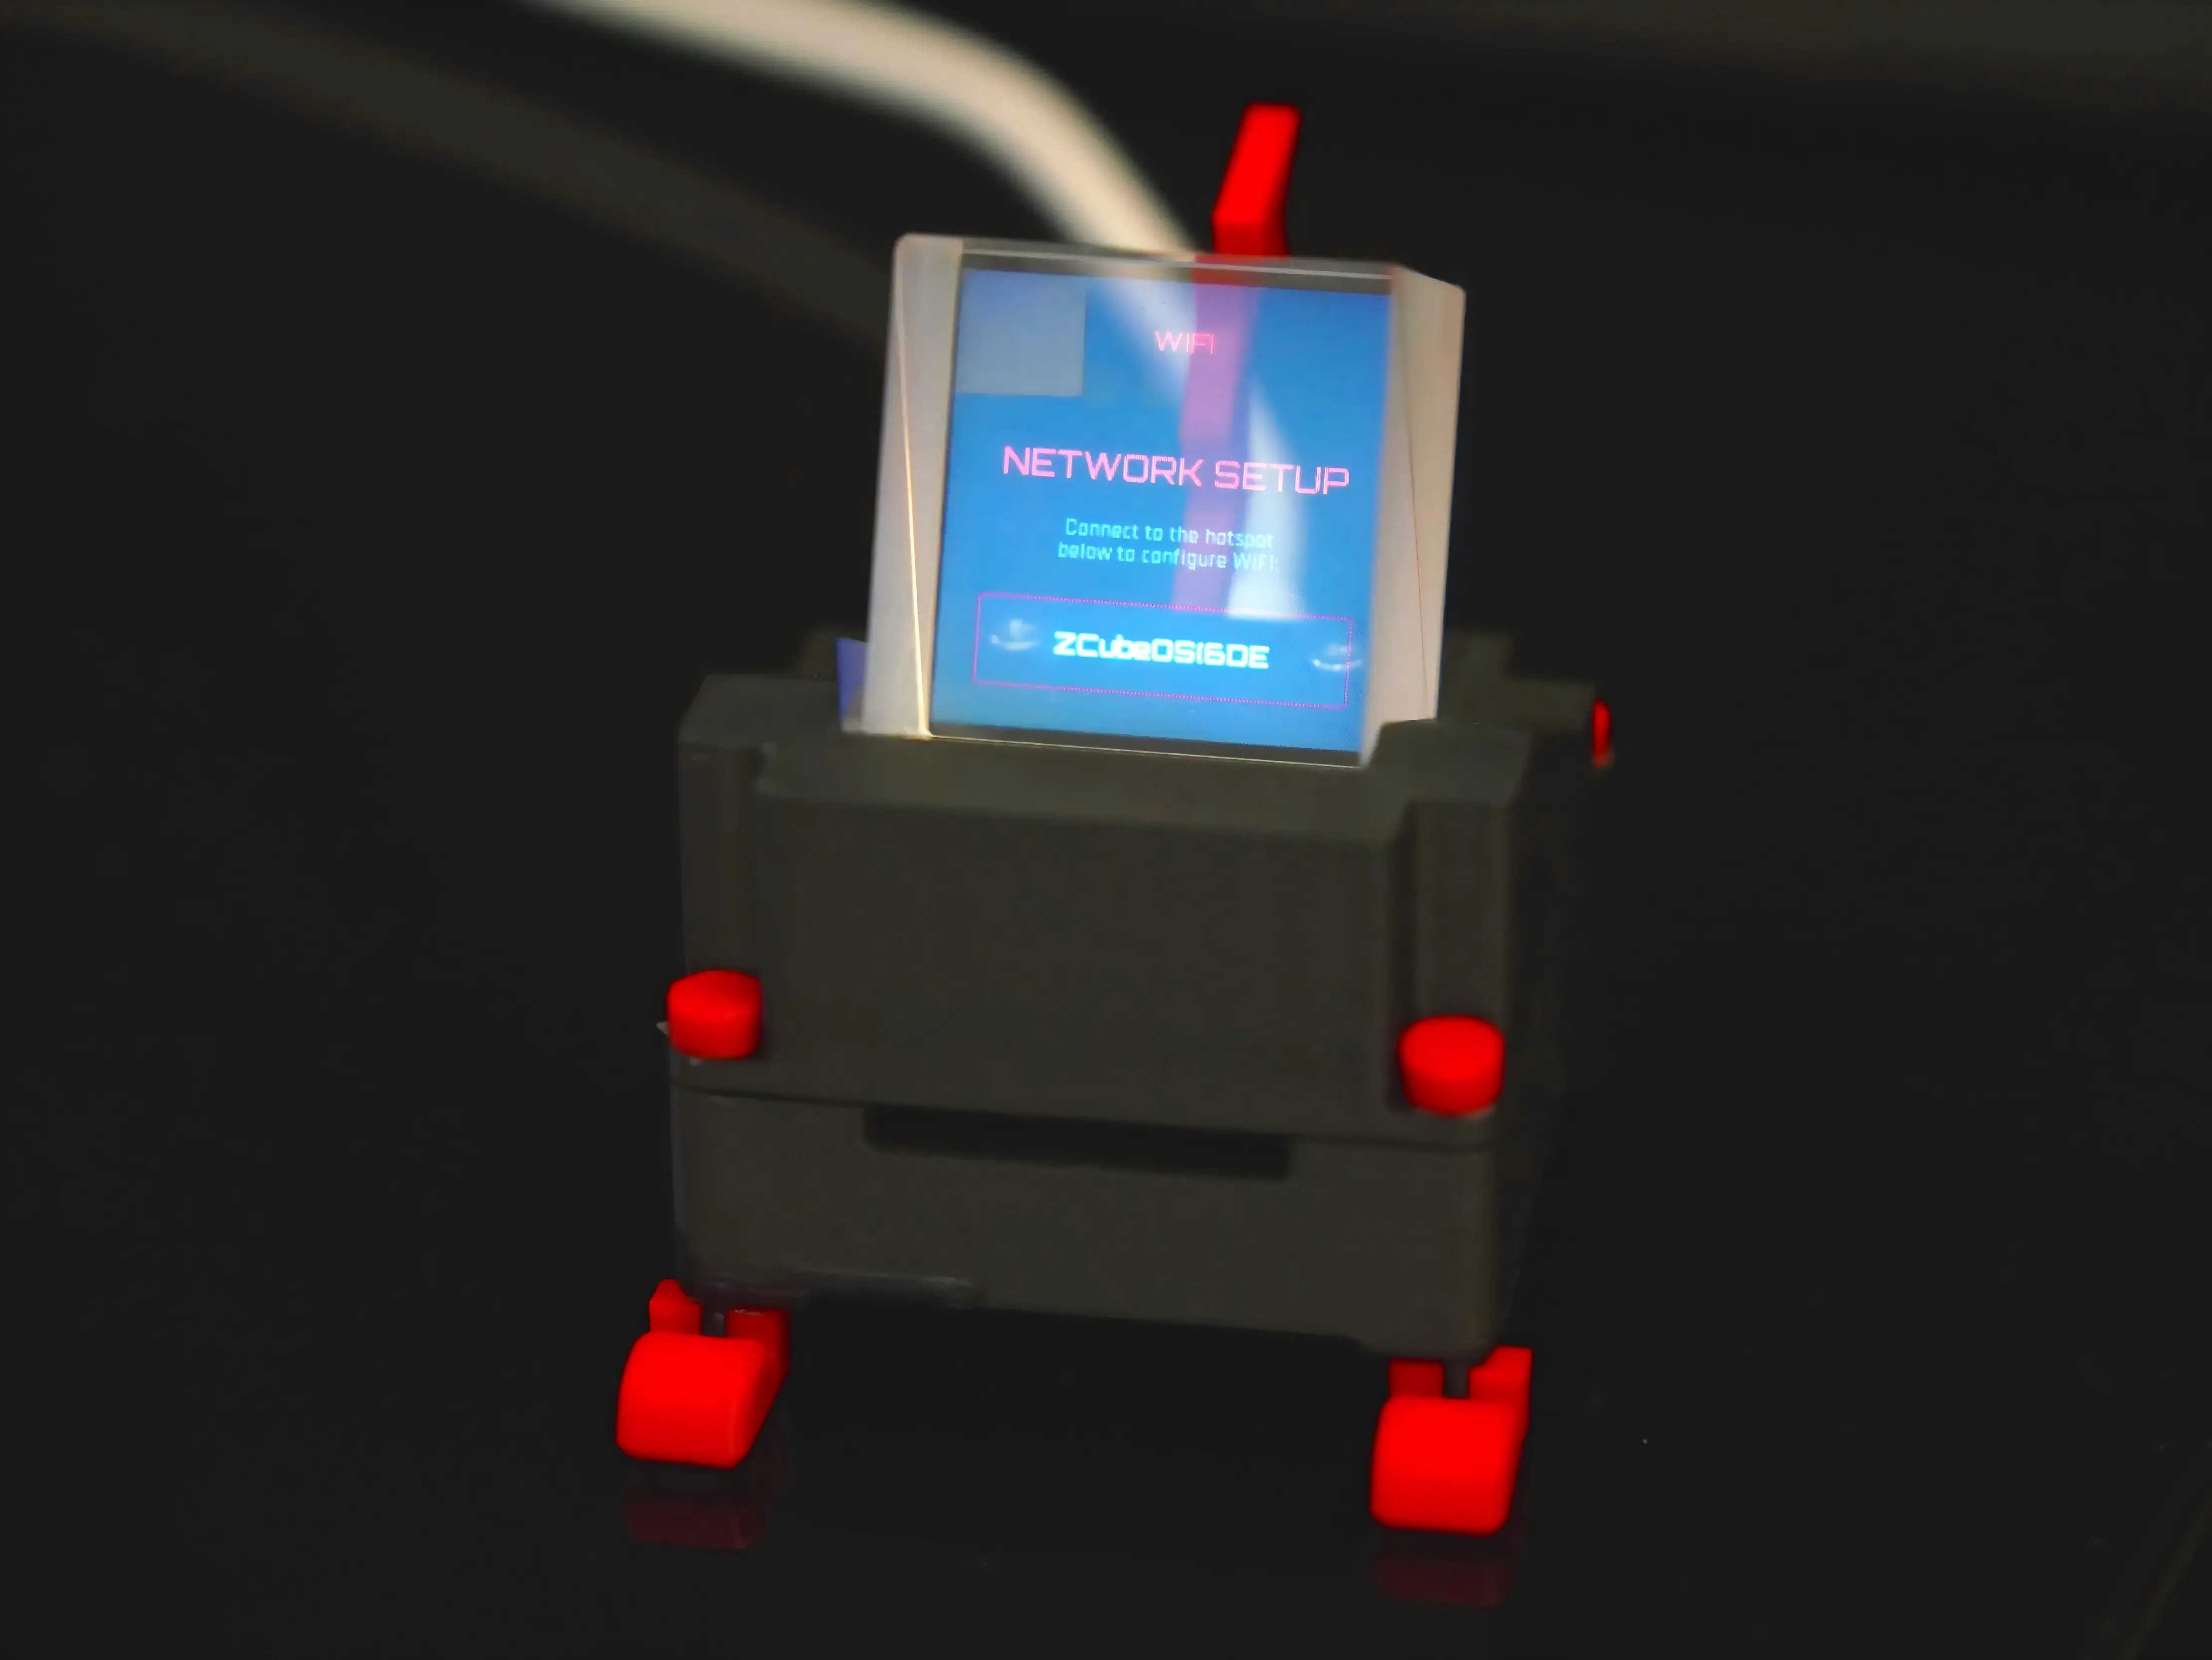
On first power-up, WatchDog doesn't know your home Wi-Fi yet, so it spins up its own hotspot and waits for you to connect — exactly like a brand-new router moving into a new apartment that opens a setup hotspot for the family to join. The whole provisioning flow takes about 3 minutes — faster than walking to the kitchen for a glass of water.
🔌 Step 1: Start Power Supply⚡️
Use the included USB cable to power WatchDog. Screen lights up = normal boot (each power-on briefly shows the network config page, then flashes the WatchDog IP address for ~10s). WatchDog now broadcasts a Wi-Fi hotspot named something like ZCube_OS(6E2D) — stable signal within ~10 meters.
📱 Step 2: Connect to Hotspot → Enter Config Page
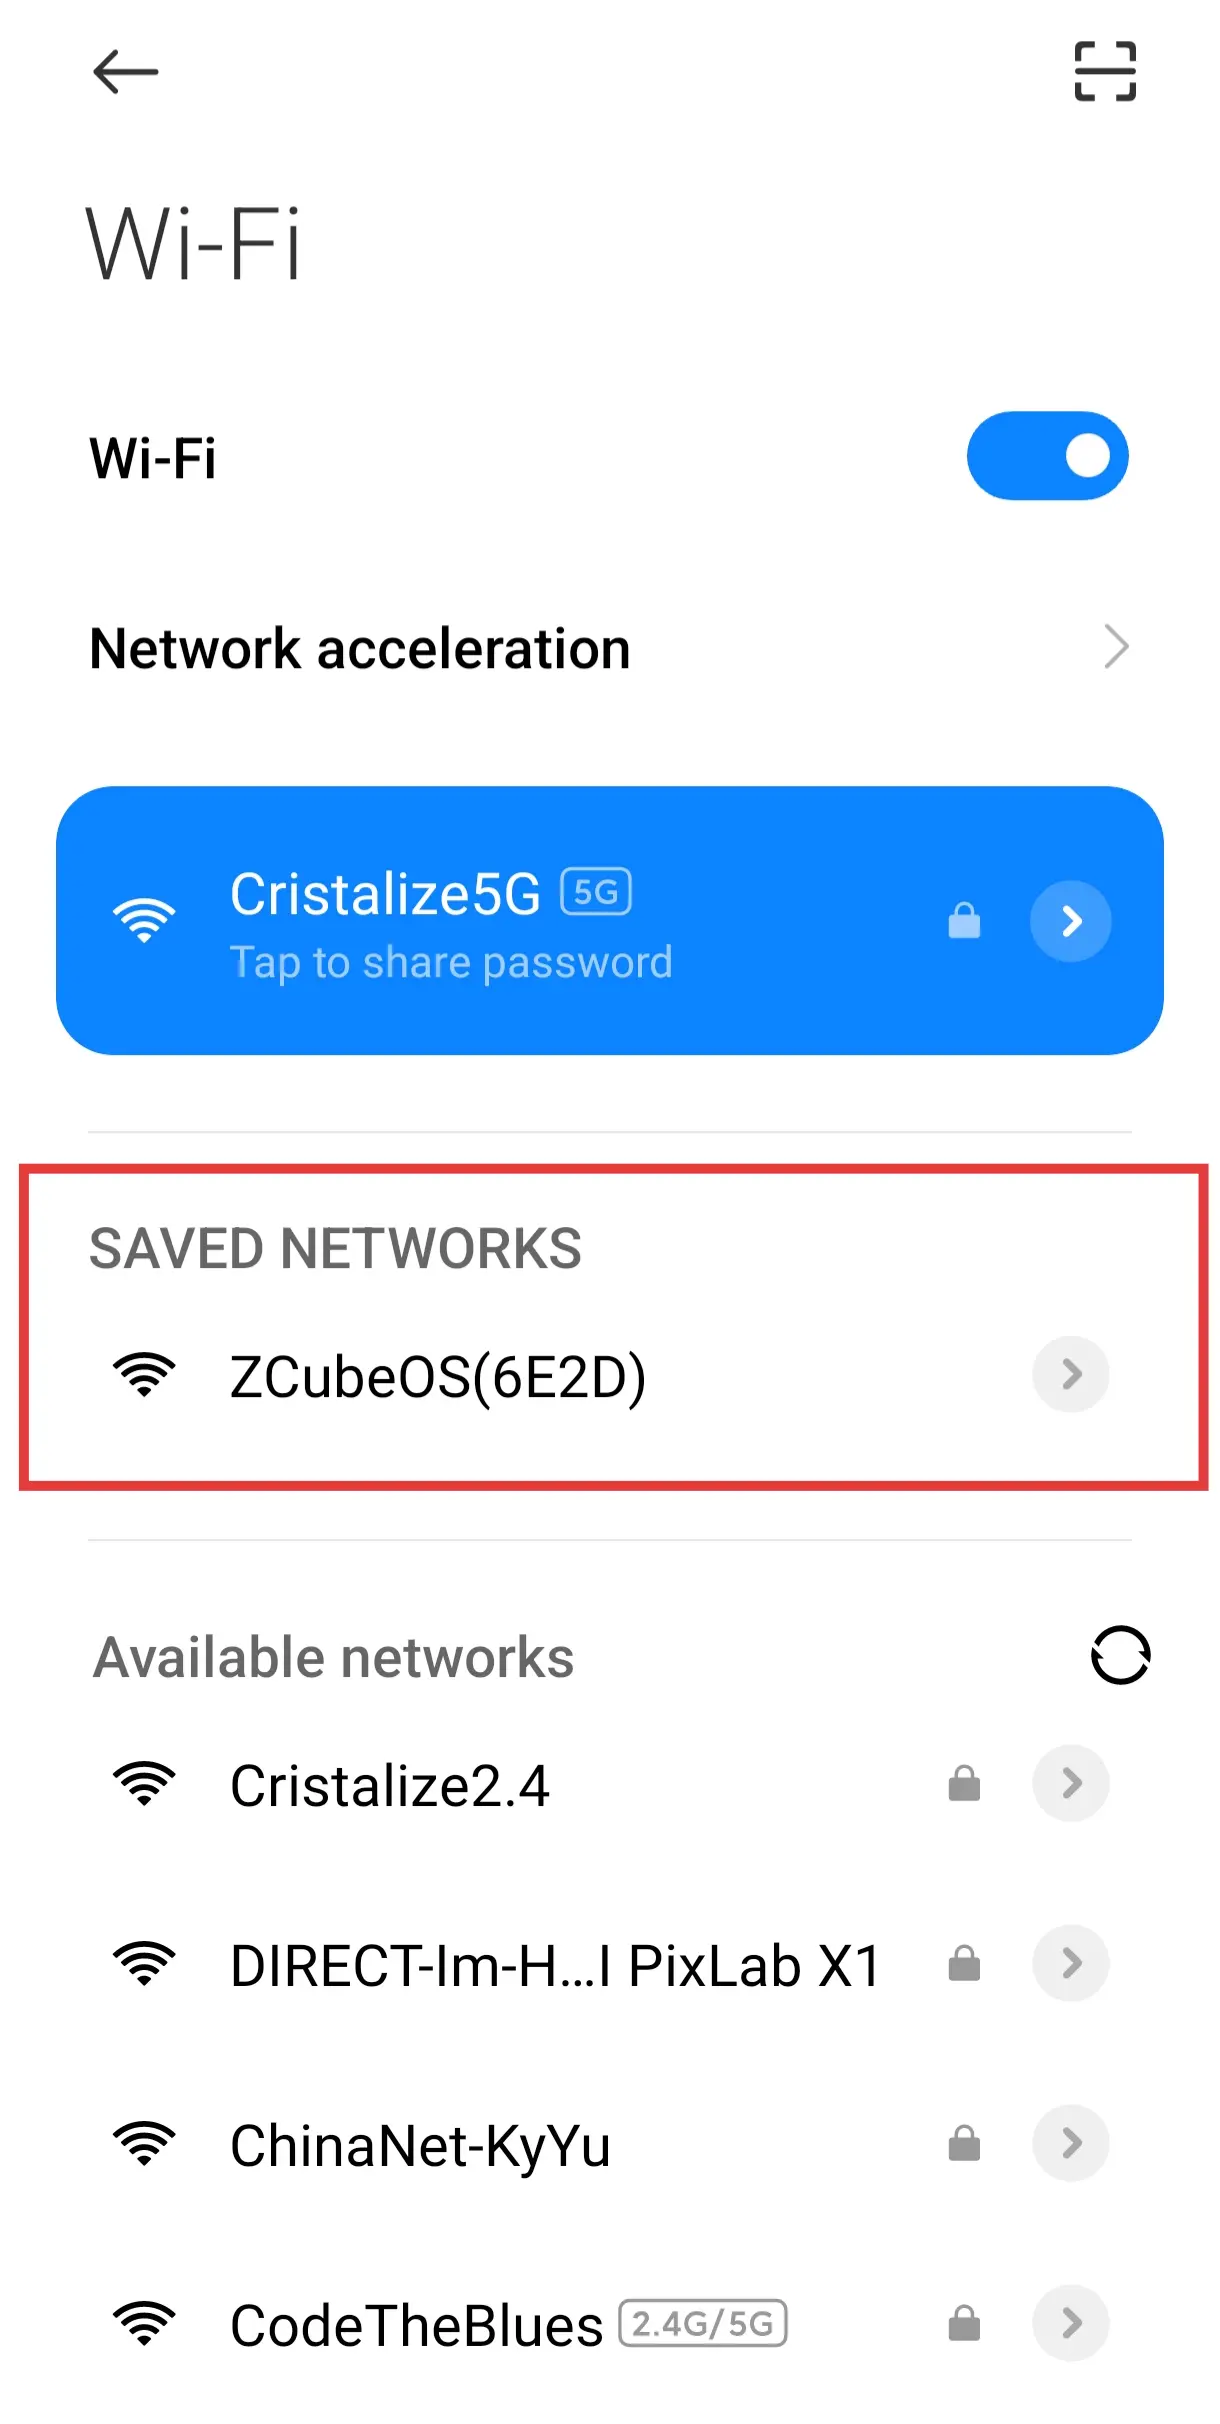
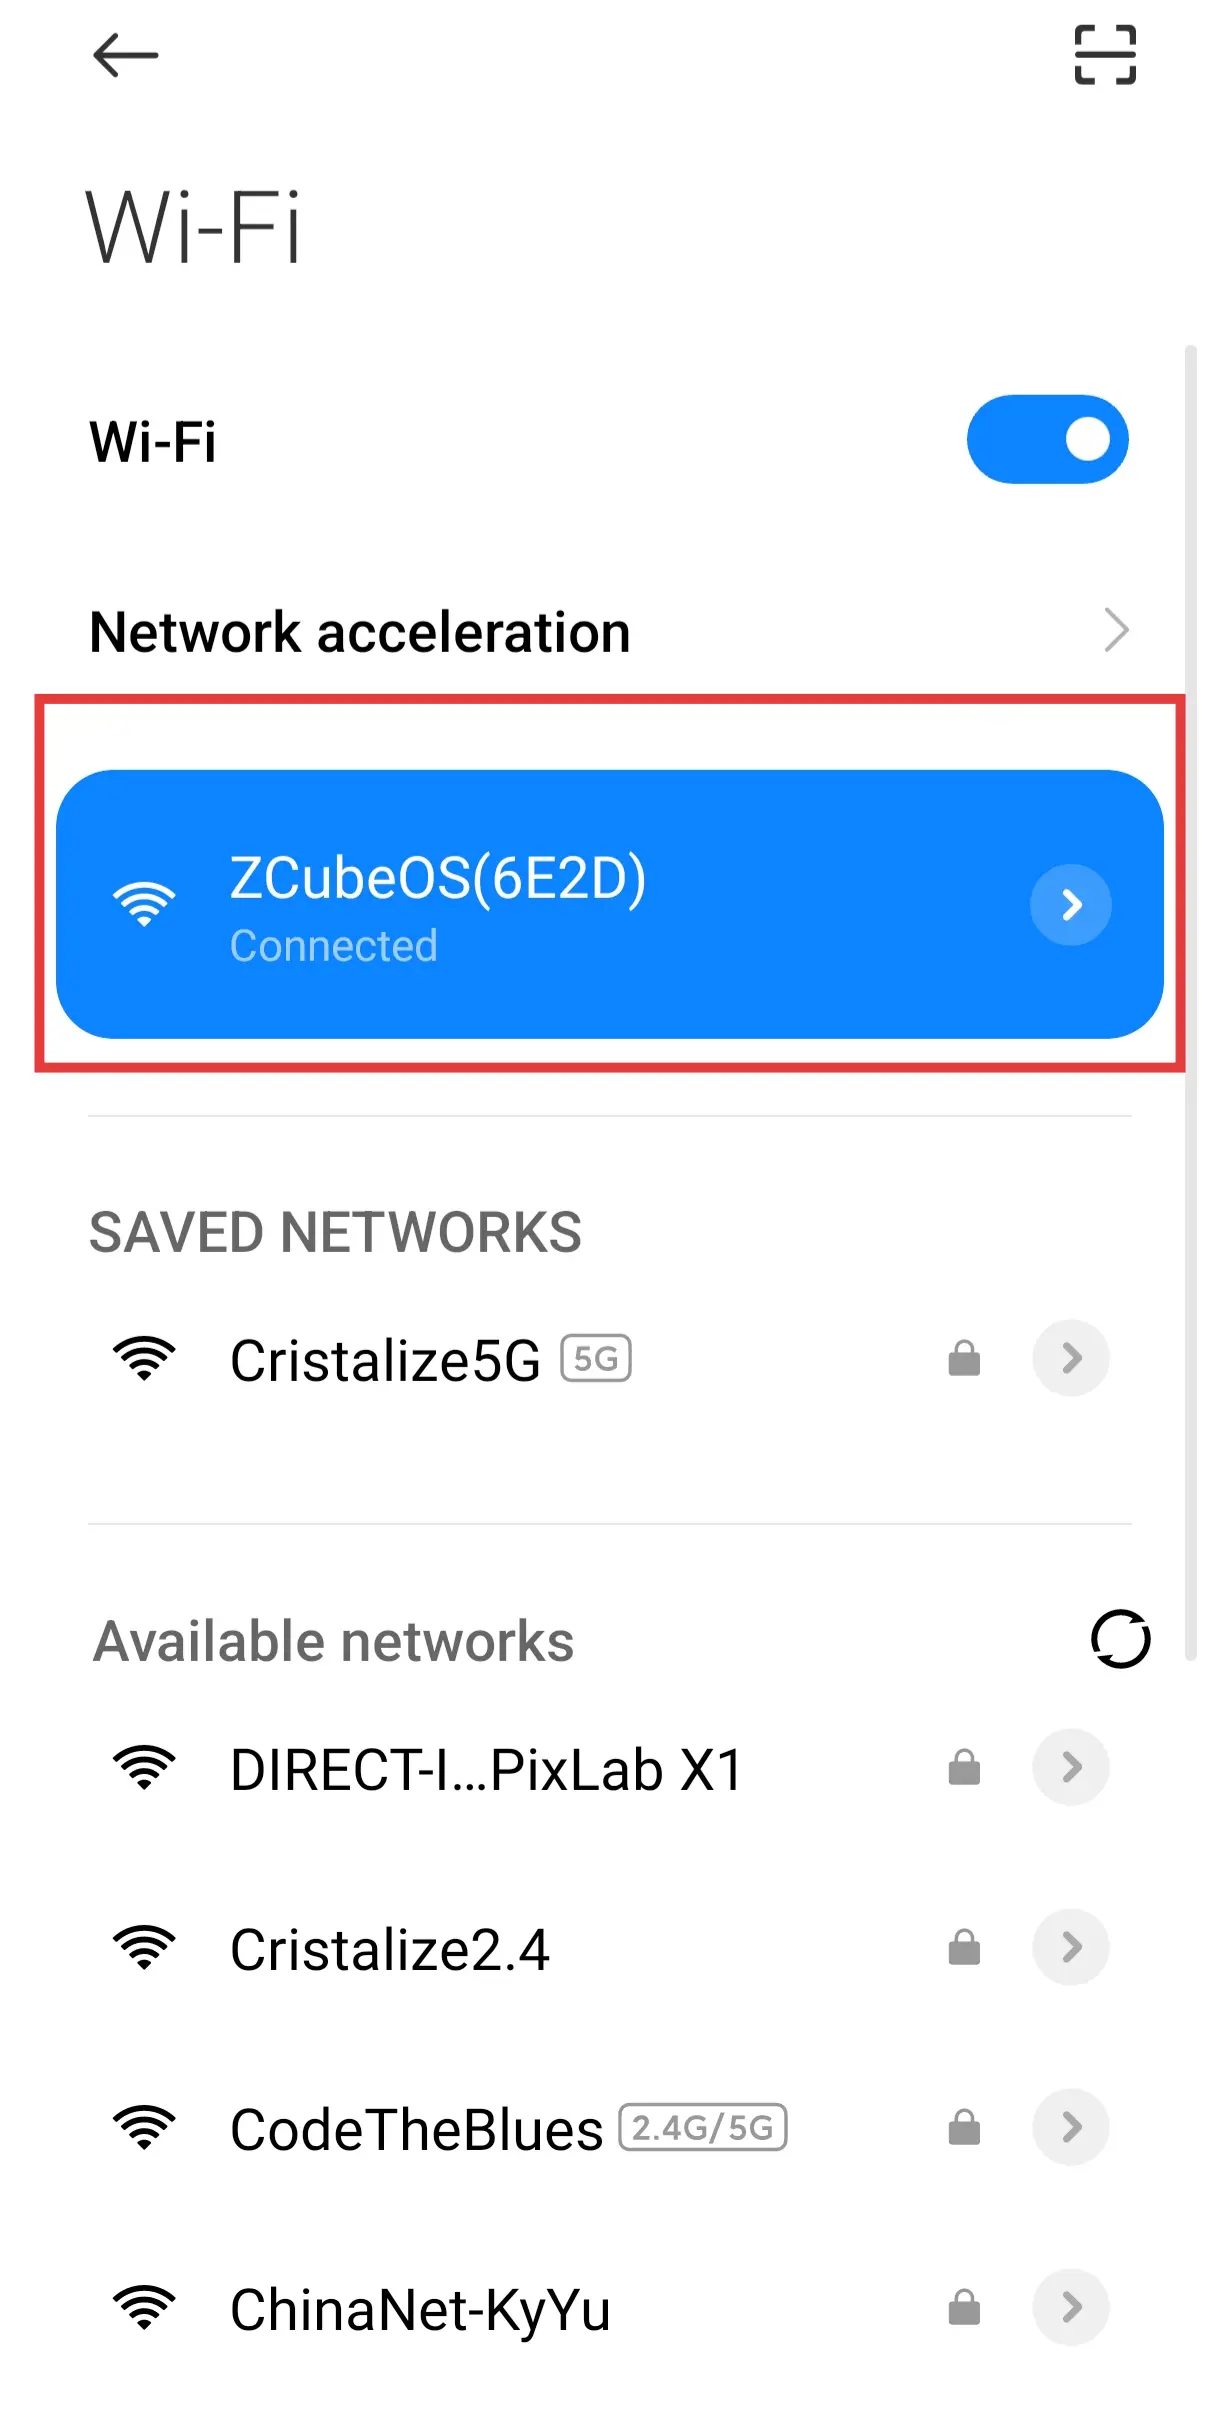
Use any phone or computer to scan Wi-Fi networks, find the one starting with ZCube_OS, and connect. The system auto-opens the Network Configuration page (via Captive Portal — connects and pops up automatically, no manual URL typing needed).
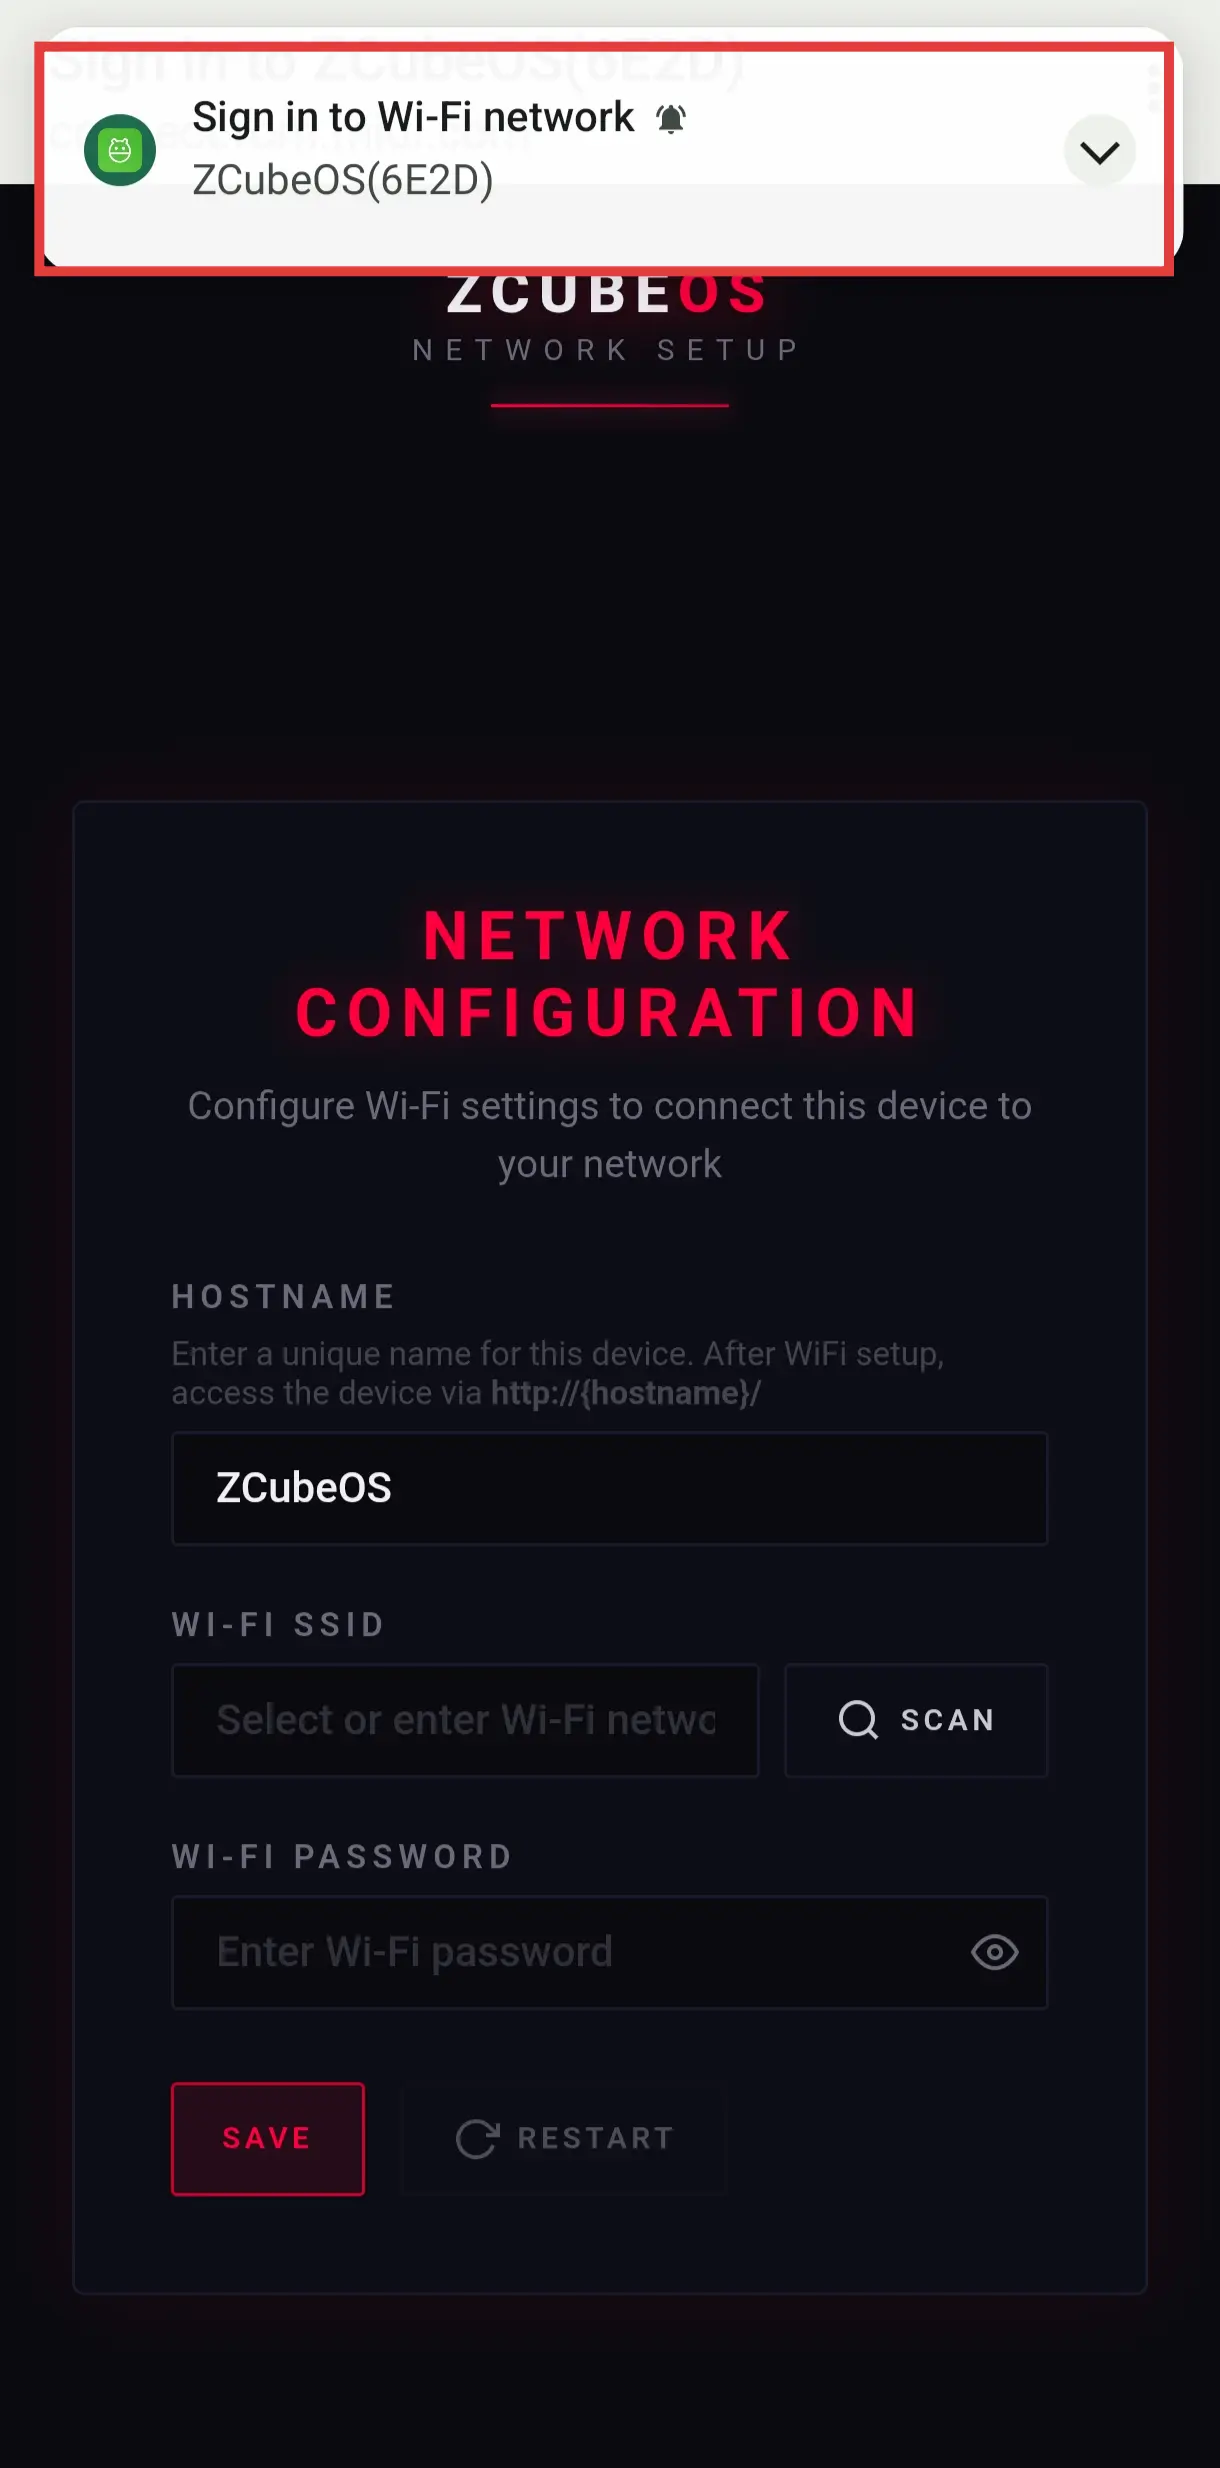
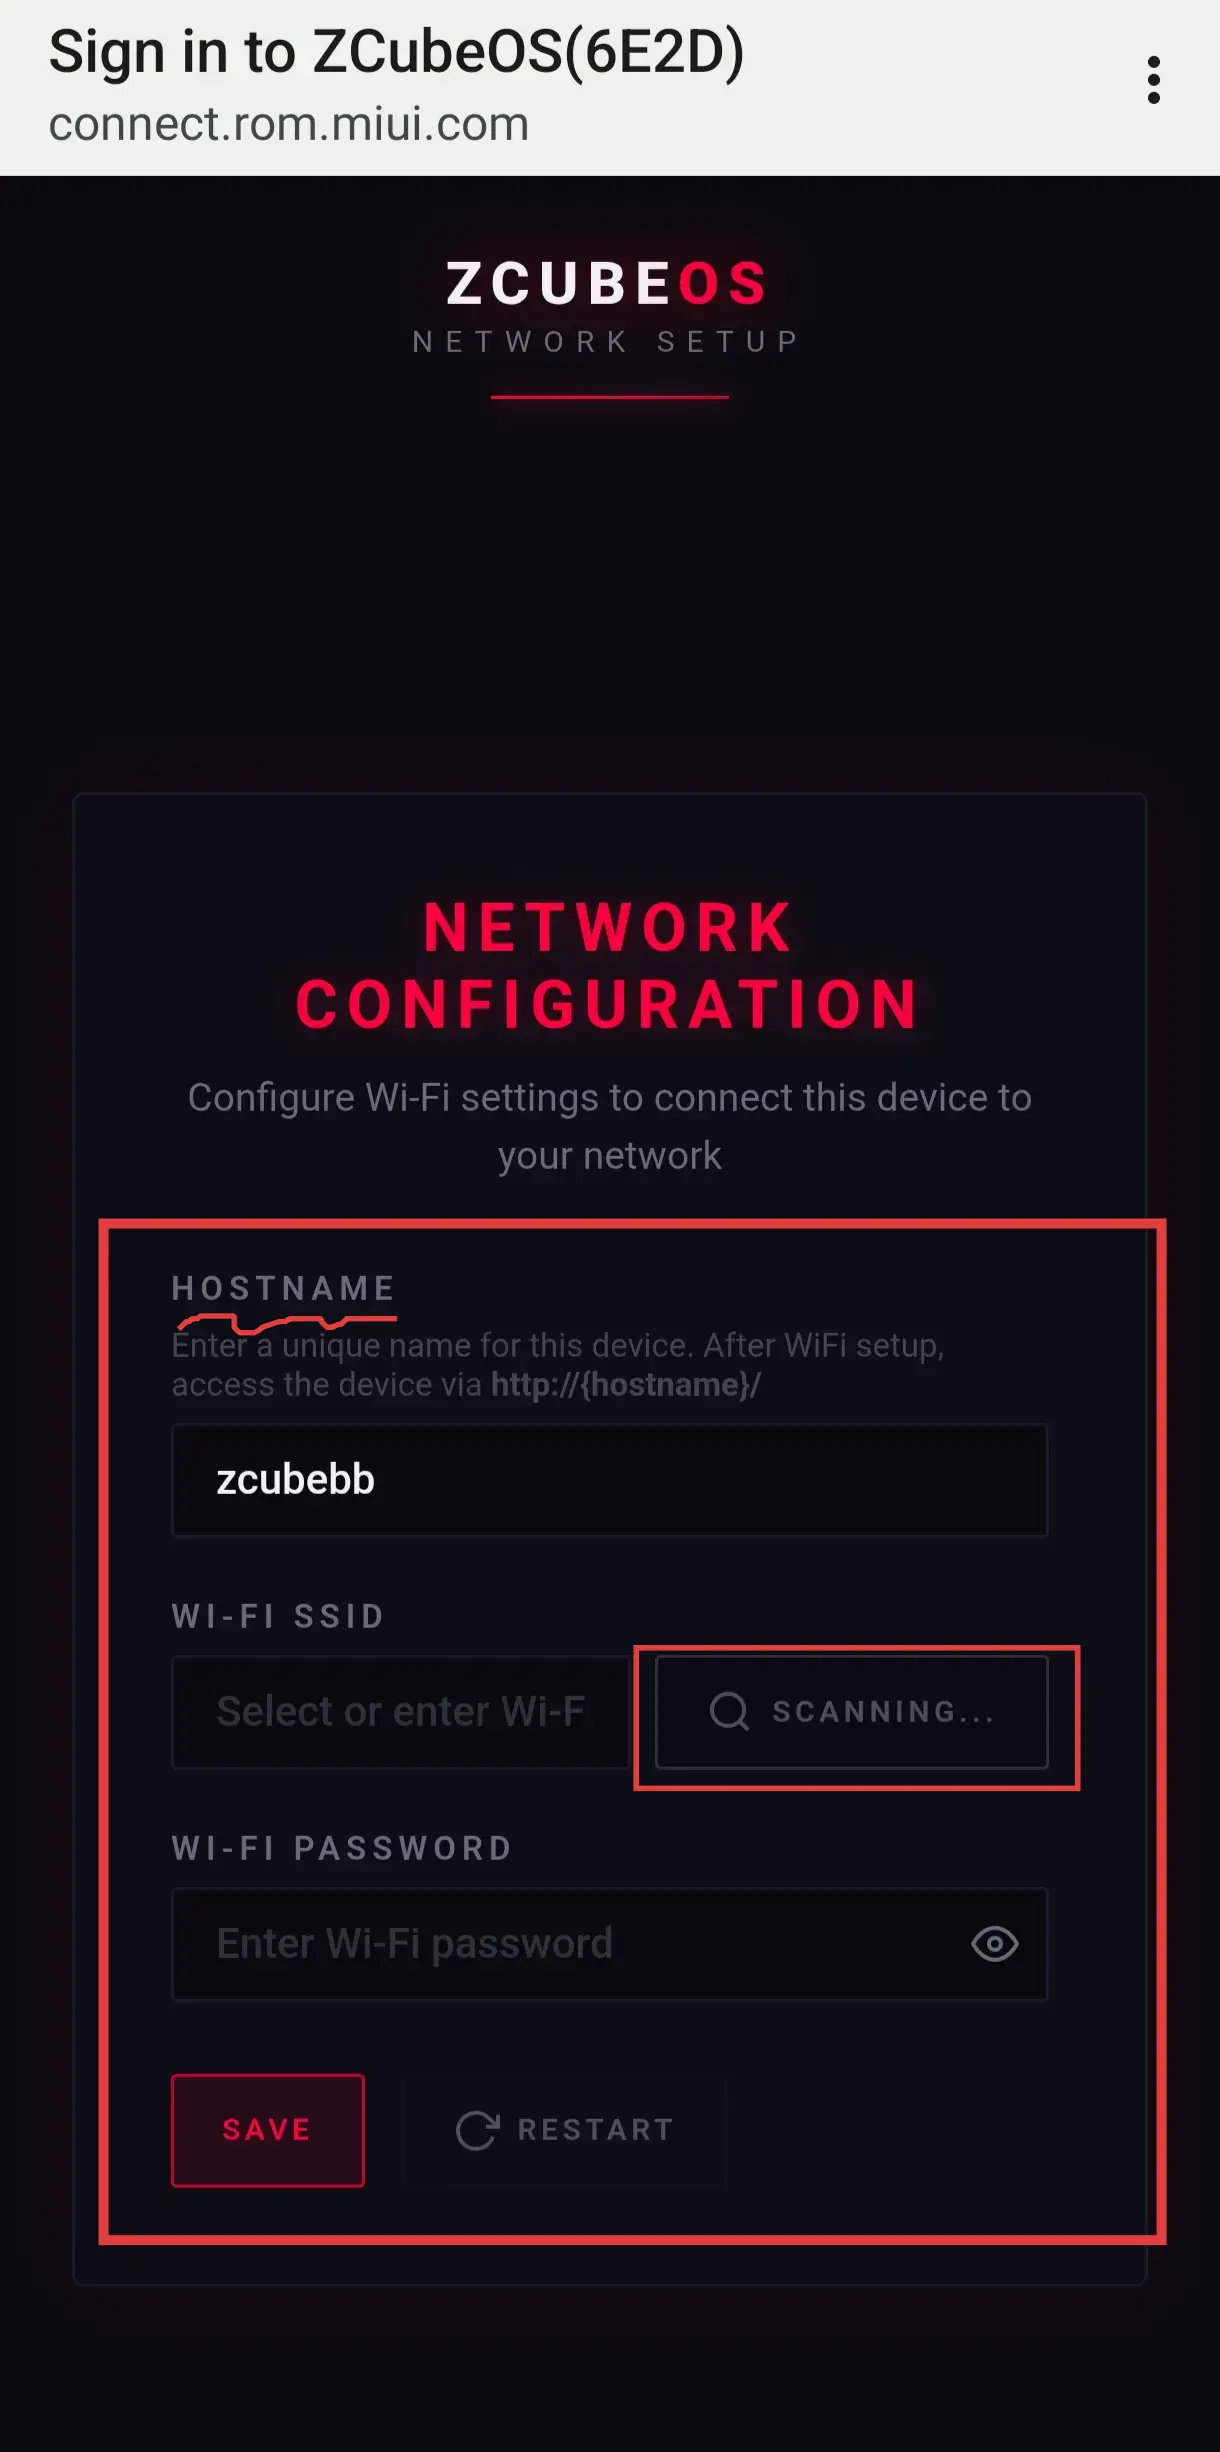
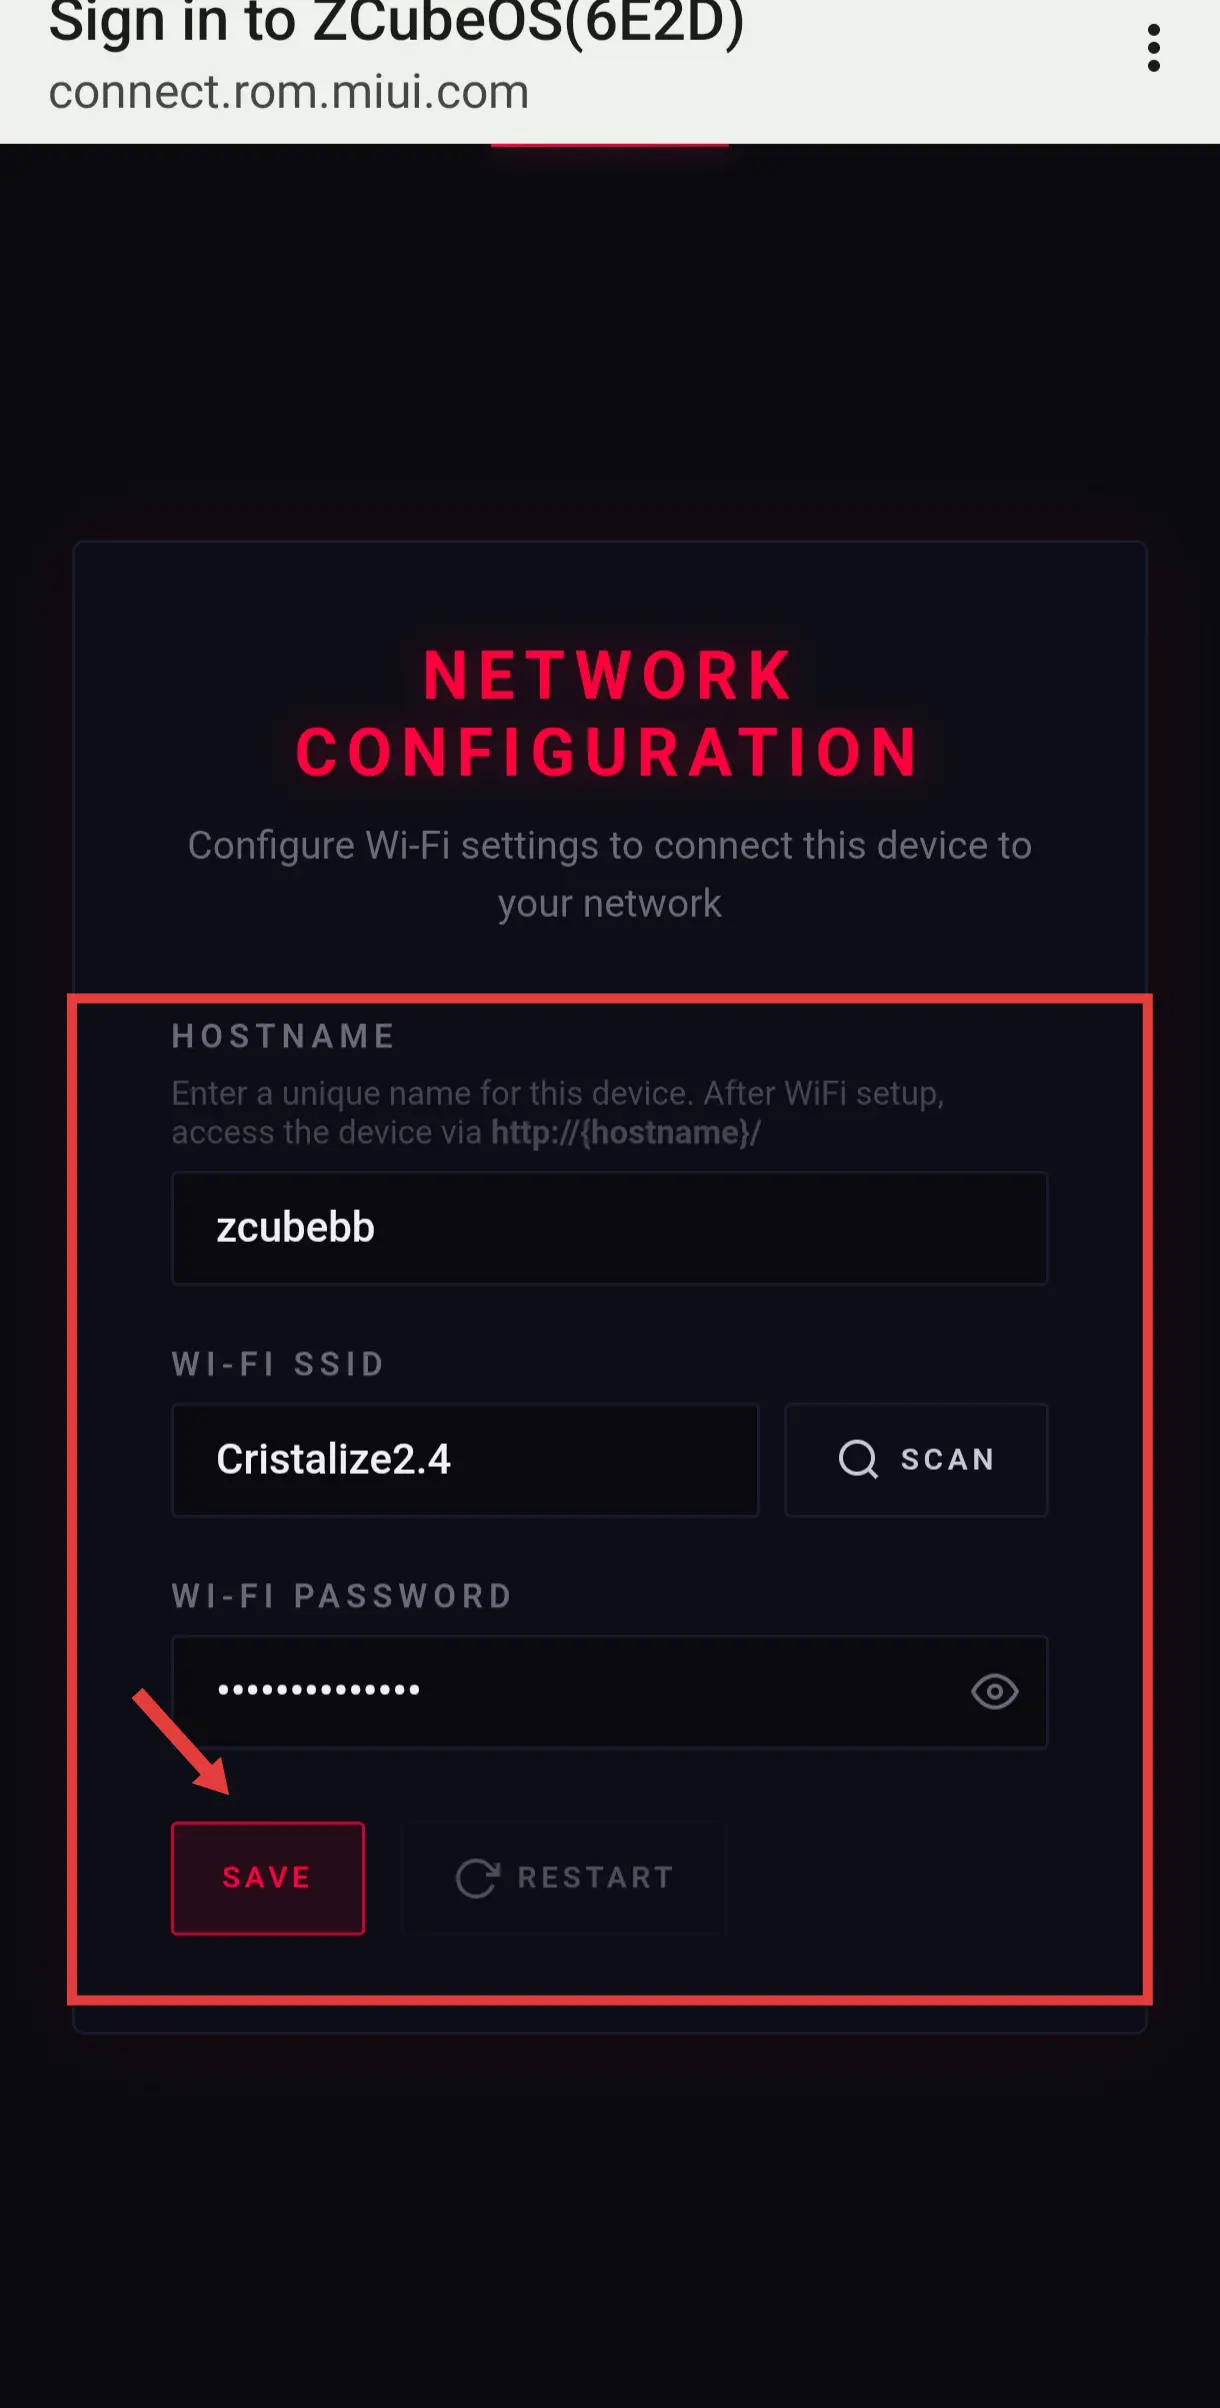
- ➡️ Hostname: Customize your device name (default: ZCubeOS). Give it a memorable alias — later you can hit
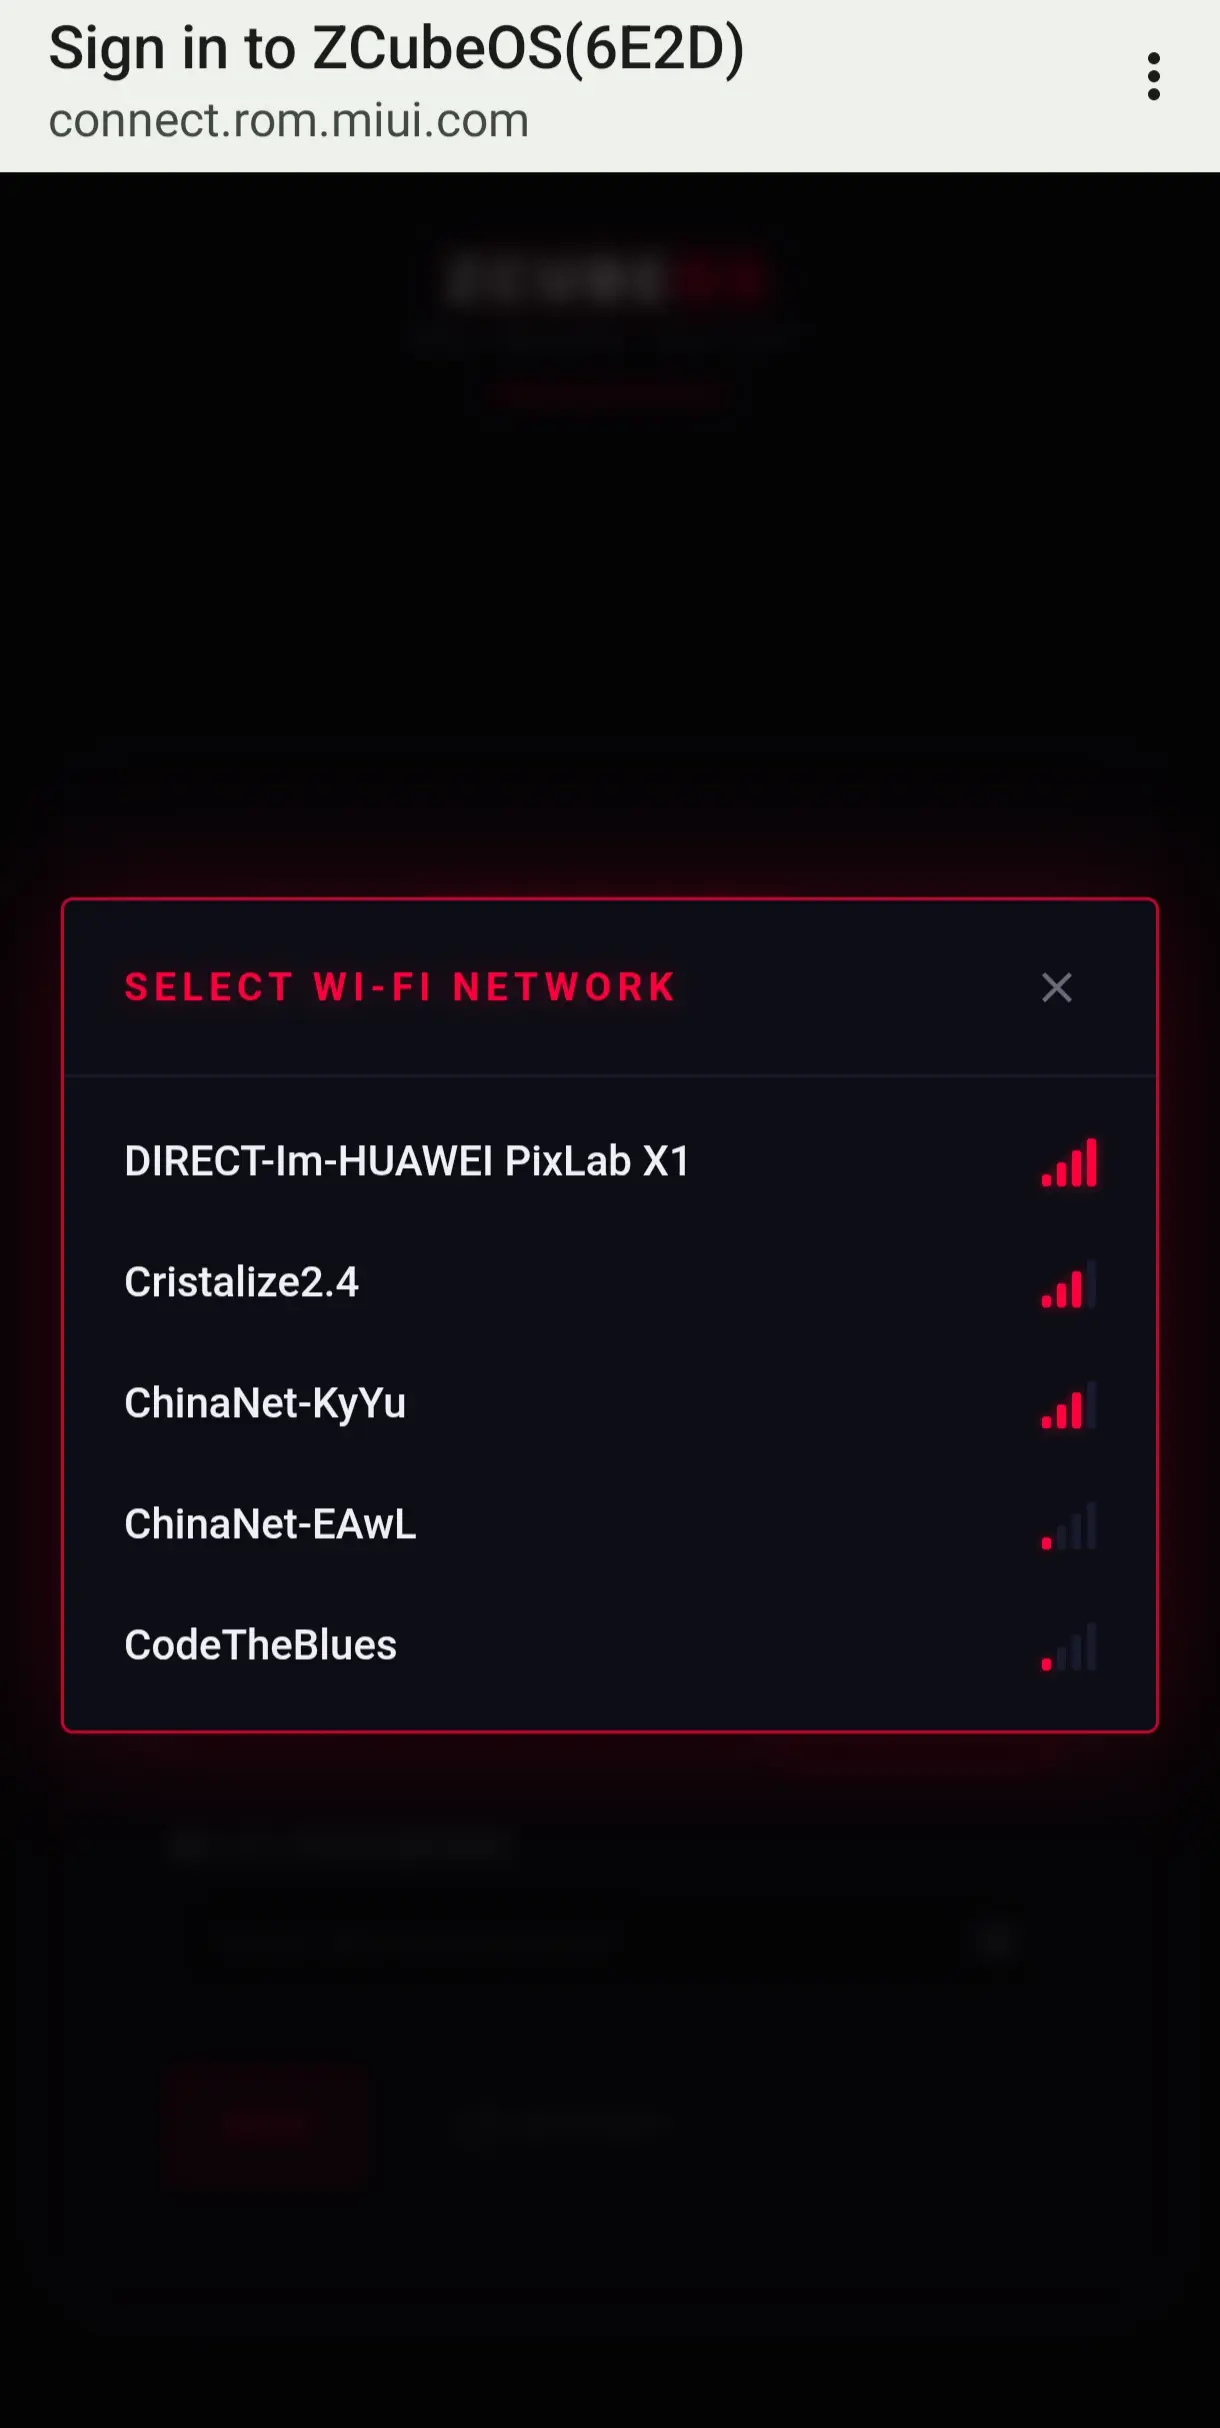
http://hostname/or the IP to reach the backend; - ➡️ Wi-Fi SSID: Click SCAN to list networks, pick your home router's Wi-Fi name; (Note: scanned networks are all usable — currently this detects 2.4 GHz bands)
- ➡️ Wi-Fi Password: Enter the password → click SAVE → then click RESTART;
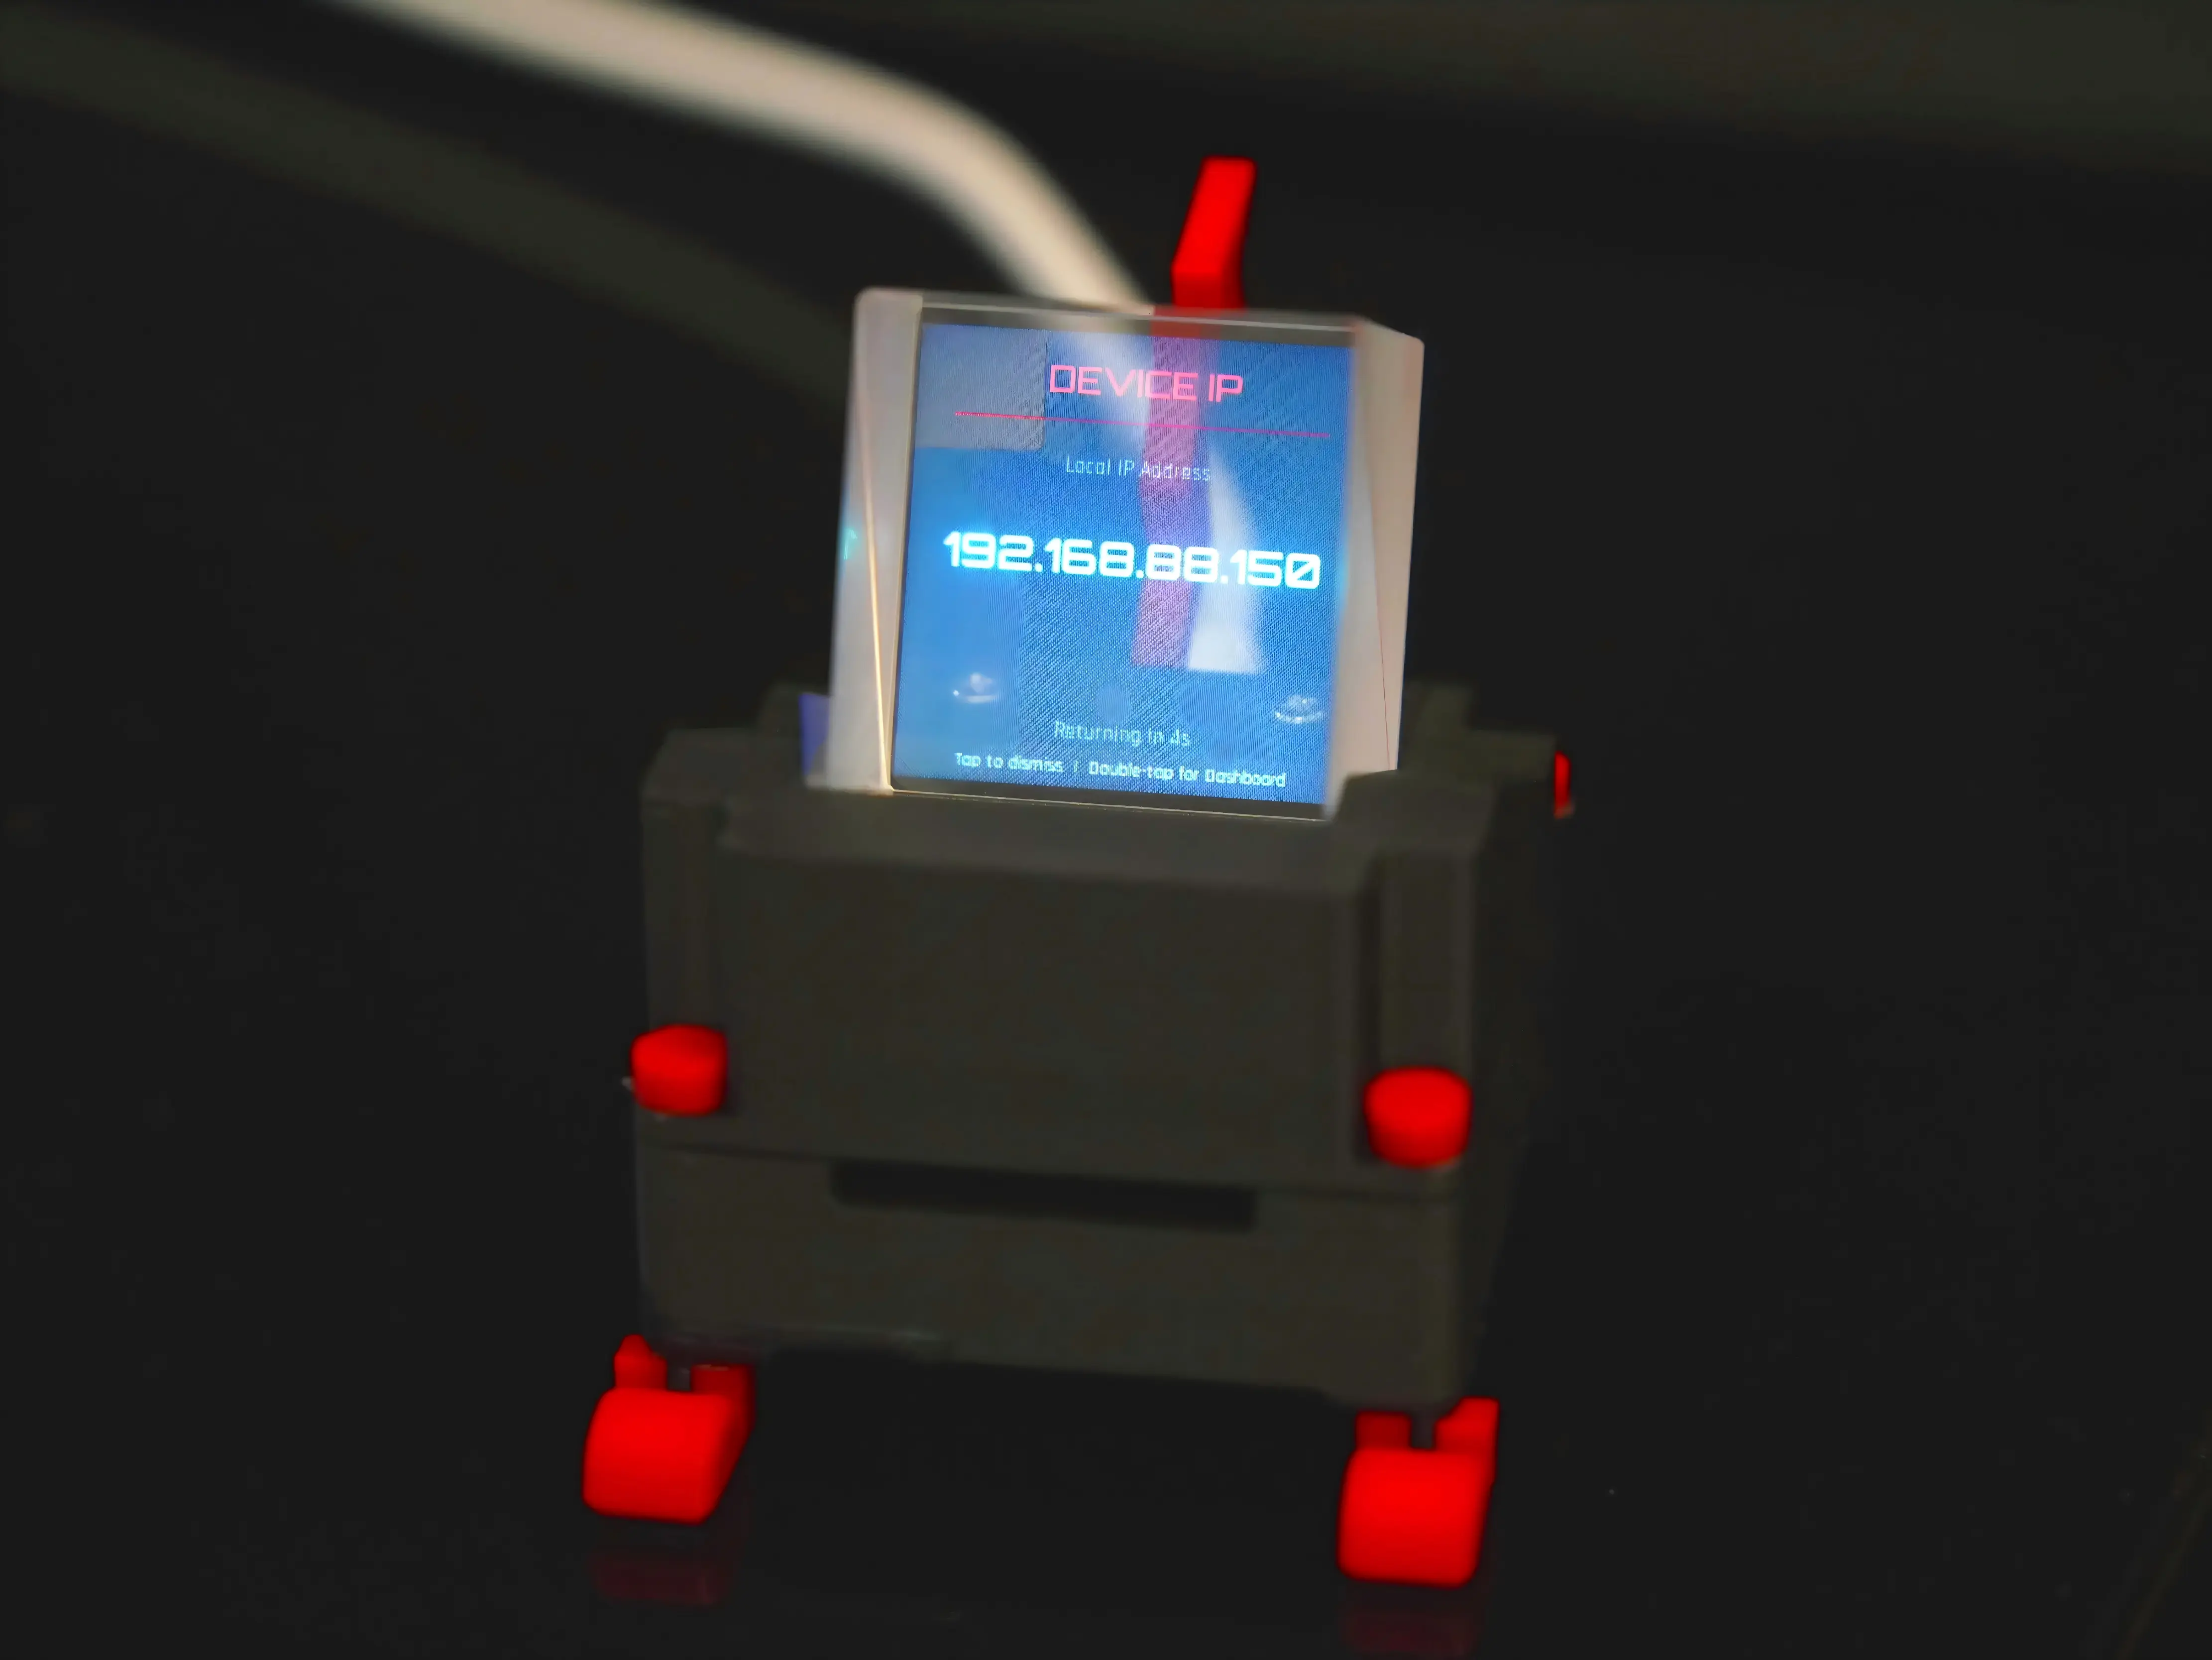
🔄 Step 3: Config Done & Enter ZCube OS
After saving, hit restart. WatchDog joins your home LAN. From any device on the same network, hit WatchDog's assigned IP (e.g., 192.168.88.201) or your custom hostname (e.g., http://zcubebb/) to open the ZCube OS Web UI directly.
💡Heads-up: After any crypto device joins, allow up to ~5 minutes for the first full LAN miner scan sweep. Already-known devices refresh status every 20 seconds.
| Config Item | Description | Example |
|---|---|---|
| Hostname | LAN identity name (customize so you don't have to memorize the IP) | zcubebb |
| Wi-Fi SSID | Your router/Wi-Fi name | Network_2.4 (detects 2.4GHz networks) |
| IP Address | Auto-assigned by router; primary backend access point | 192.168.88.201 (example only) |
3. ZCube OS Dedicated Backend
ZCube OS is the purpose-built Web UI backend for Solo Miner LCD WatchDog — not some slapped-together firmware page. Its positioning is closer to a "lightweight centralized control system," deeply optimized for home miners.
How to open it: In any browser on the same LAN, type WatchDog's IP (e.g., 192.168.88.201) or your custom hostname (e.g., http://zcubebb/). That's it — you're in.
3.1 ZCube OS → Feature Quick Reference
| Menu | Core Function | Use Case |
|---|---|---|
| Dashboard | Live aggregated miner data — click through to each device's own backend (Bitaxe/NerdQaxe++/Zyber OS) from the card | Daily monitoring |
| System | WatchDog's own network/hardware status | Debug connection issues |
| Batch Setting | Bulk-configure pool (Primary + Fallback) across all selected miners | Swap pools across 3+ miners at once |
| Settings | Pending (unlocked in future builds) | — |
| Update | OTA firmware upgrade / Web Binary update | Version upgrades |
| Restart | One-click soft-restart of WatchDog | Apply config / recover from glitch |
3.2 Dashboard: Data Command Center📊
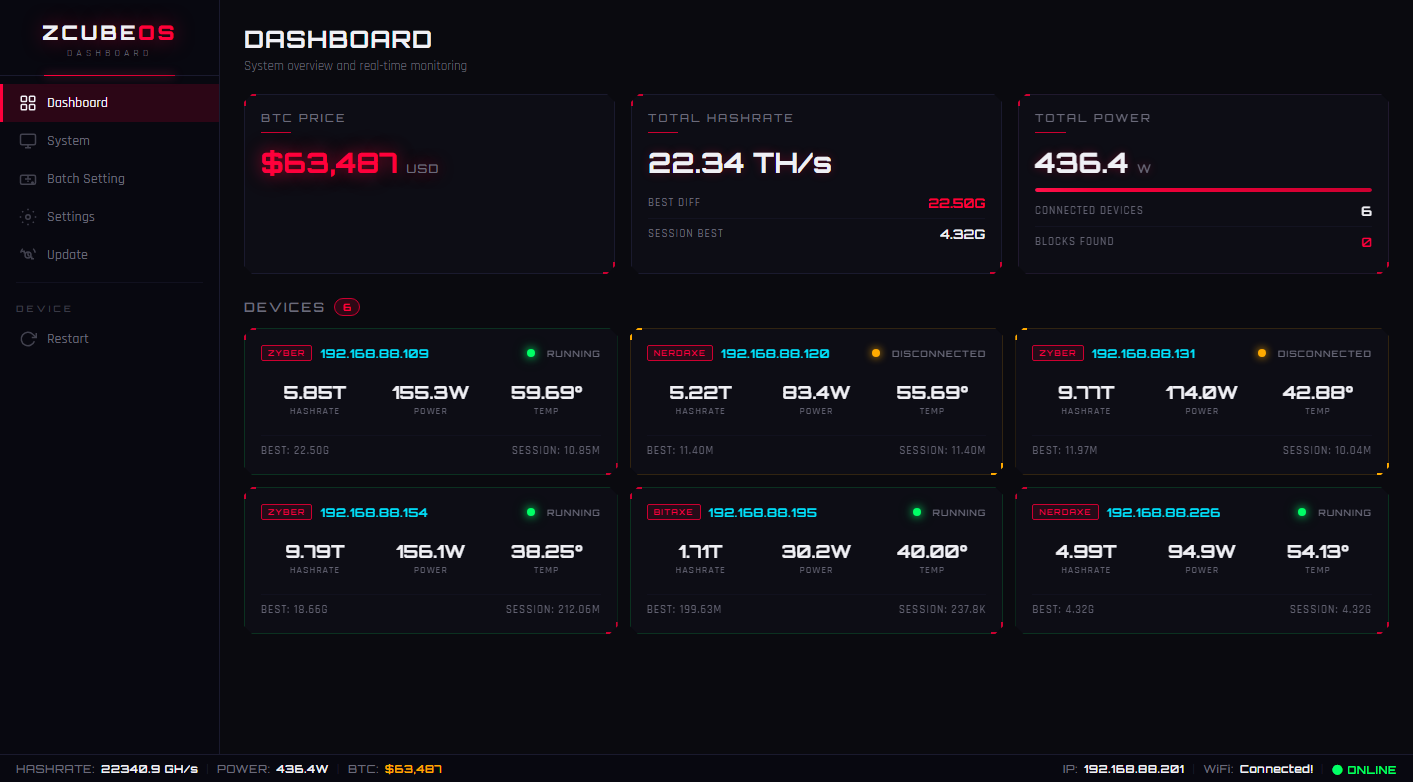
The ZCube OS Dashboard is the heart of the backend. Four core cards on the page:
- BTC PRICE: Live BTC/USD — synced over the network (major refresh every ~5 min)
- TOTAL HASHRATE: Sum of all detected device hashrate (ex: 22.34 TH/s), with Best Diff and Session Best shown
- TOTAL POWER: Combined power draw of all devices (ex: 436.4 W), with Connected Device count and Blocks Found
- DEVICES Area: Individual card per miner — IP address, Hashrate, Power, Temp, and online/offline status (green dot = Running, orange dot = Disconnected)
Remember: every miner's IP shown in the DEVICES area is clickable — jumps straight to that miner's own backend Web UI without typing a thing. Bottom-left shows total hashrate, total power, and BTC/USD. Bottom-right shows WatchDog's own IP, Wi-Fi status, and online indicator…
3.3 System⚙️: Check Backend Status
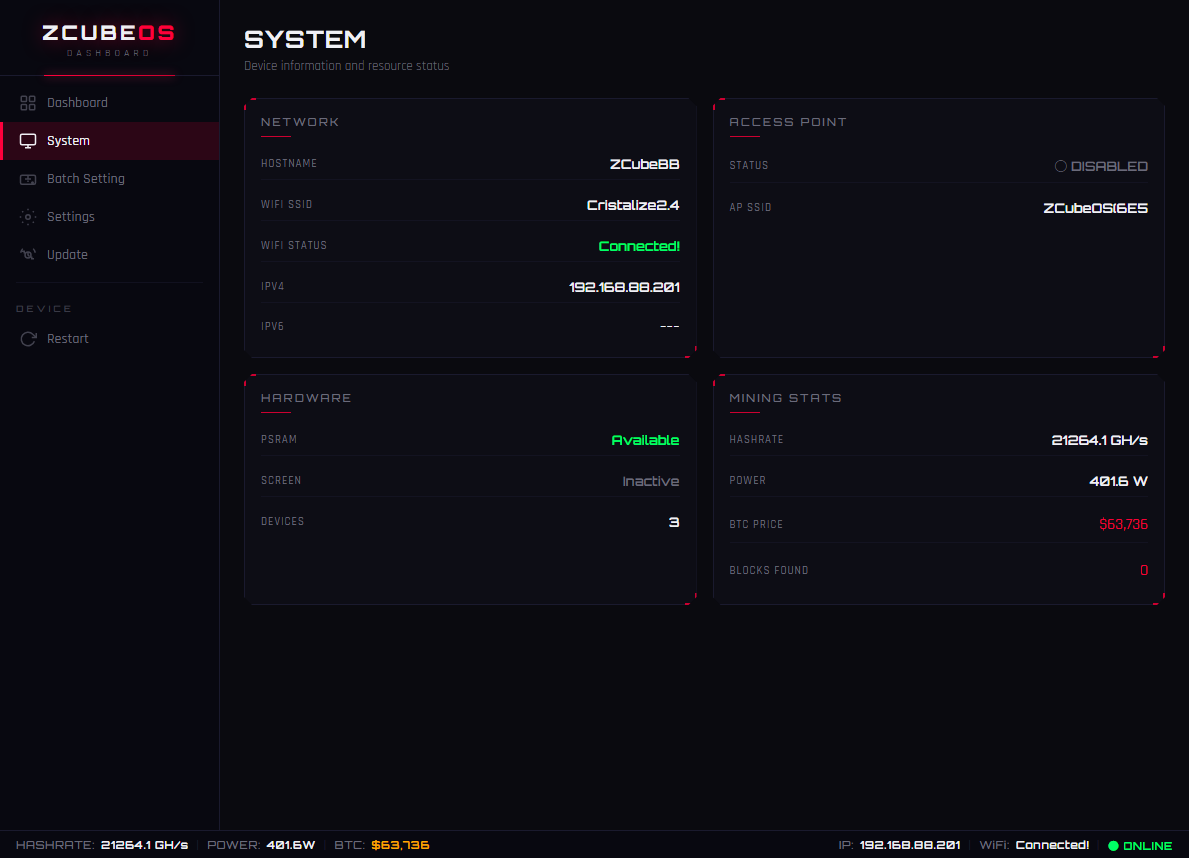
The System page displays WatchDog's own hardware & network telemetry: Hostname (again — if you set it to ZcubeBB, then http://zcubebb/#/ gets you straight back in), Wi-Fi SSID & link state, IPv4 address, PSRAM status, Screen status, and connected device count. Full system snapshot on one page — no digging. Additional functions ship as TCH engineers develop them.
3.4 Batch Setting🔧: One-Click Pool Swap Across All Miners
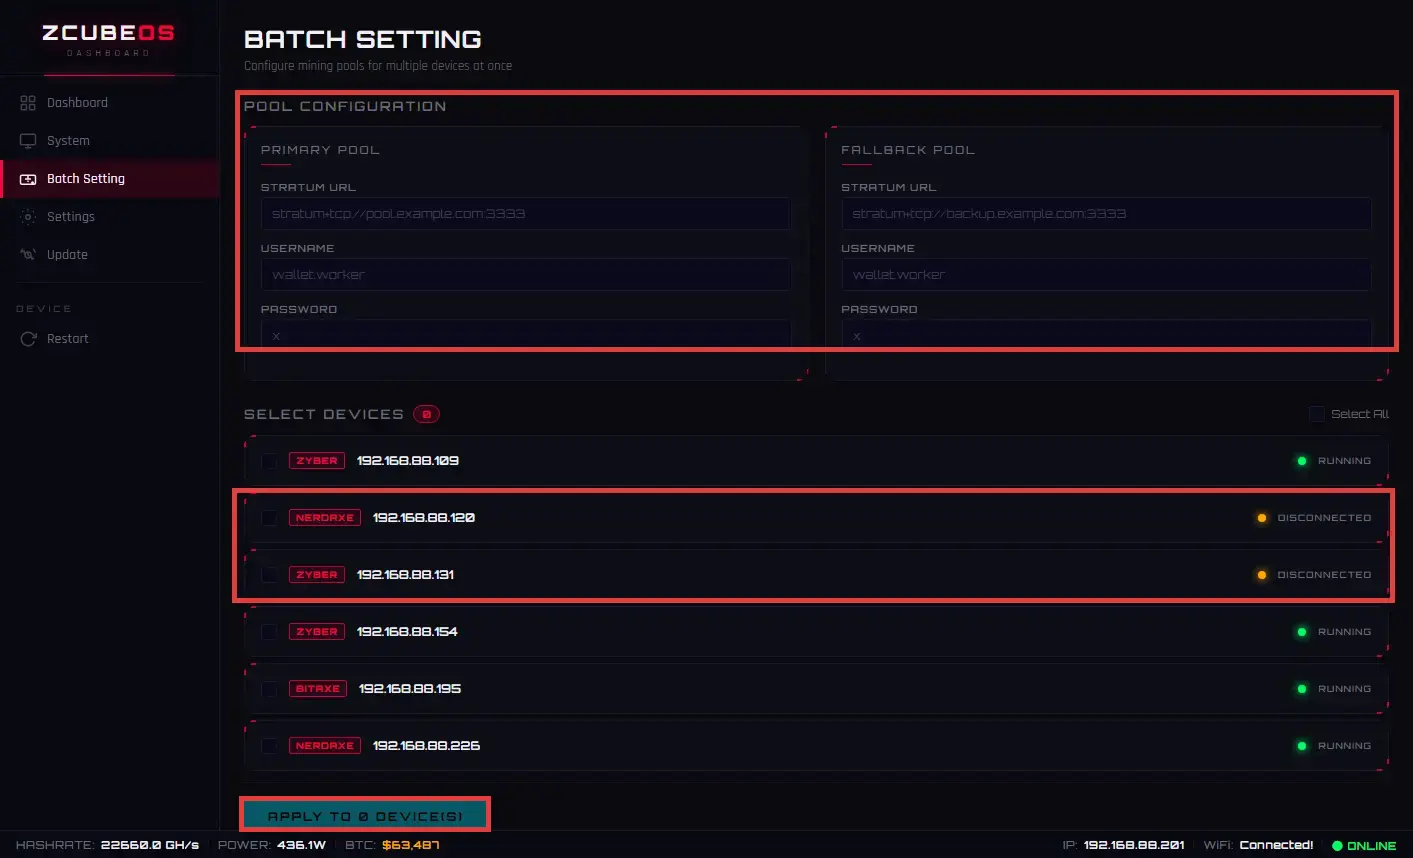
Got 3+ new miners and need to point them all at a new pool — or the old pool's dead to you? Don't log into each one's backend one-by-one. Open WatchDog's ZCube OS → go to Batch Setting, fill in Primary Pool and Fallback Pool (Stratum URL, Username, Password), tick the boxes for the miners you want, hit APPLY TO N DEVICE(S), and it pushes the config down to all of them. Honestly? This one feature alone justifies the hardware. Batch Setting is a genuine time-saver.
3.5 Settings: More Options Coming Soon🖥️
More configuration options — ETA in upcoming releases. Users are welcome to drop feedback or optimization suggestions in the comments or on TCH's social channels. TCH is always online for you….
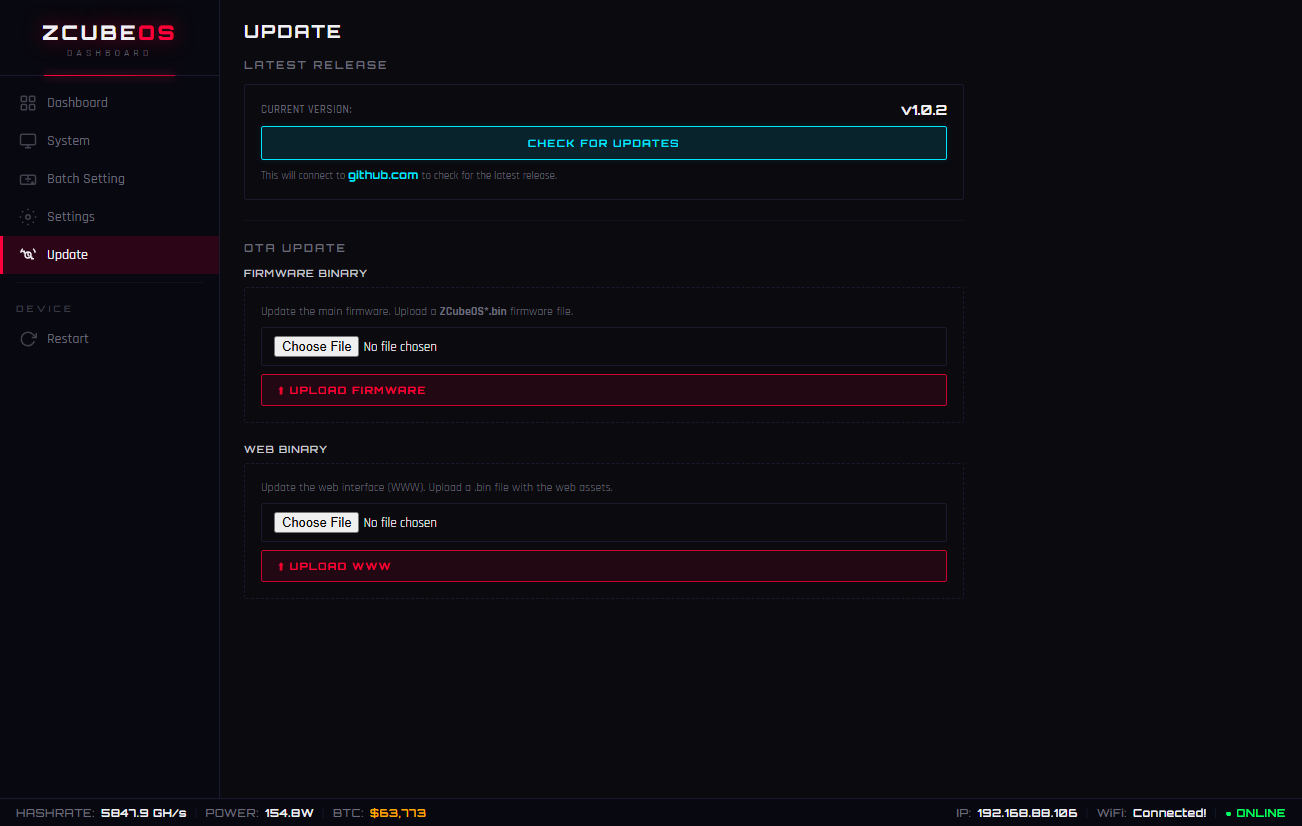
3.6 🆕 Update: Flash the Functional Firmware (Required 🔥)
WatchDog ships with a base bootloader/bridge firmware — core features aren't fully unlocked yet. Think of it like buying a game console that powers on and the controller pairs, but there's no game installed. Screen lights up, internals are healthy — but it won't do the job. Flashing the ZCubeOS functional firmware (latest: v1.0.2) activates Dashboard, Batch Setting, miner aggregation — the actual good stuff. And when new features drop later, OTA updates push them right to you!
Step 1: Grab the Firmware Files 💪
Head to the official GitHub Releases page:
- Latest release here: https://github.com/TinyChipHub/ZCube-OS-Release/releases
- Download: ZCubeOS.bin and/or www.bin — for the latest OTA path, look for zcube-os-factory-v1.0.2.bin
Step 2: Flash via the Update Page 🔥
- Enter the ZCube OS backend, click Update in the left menu
- First, try the CHECK FOR UPDATES button — it pings GitHub Releases directly and compares version numbers (current version shown top-right, e.g. v1.0.2)
- If an update is found, it'll prompt you to download — or you can View on GitHub to verify
- In the OTA UPDATE section, hit Choose File and upload the downloaded .bin firmware file
- Click UPLOAD FIRMWARE and wait for the progress bar to finish
- To also update the Web UI assets, upload the corresponding file in the Web Binary section and click UPLOAD WWW
- Once done, device auto-restarts — back online in ~30 seconds
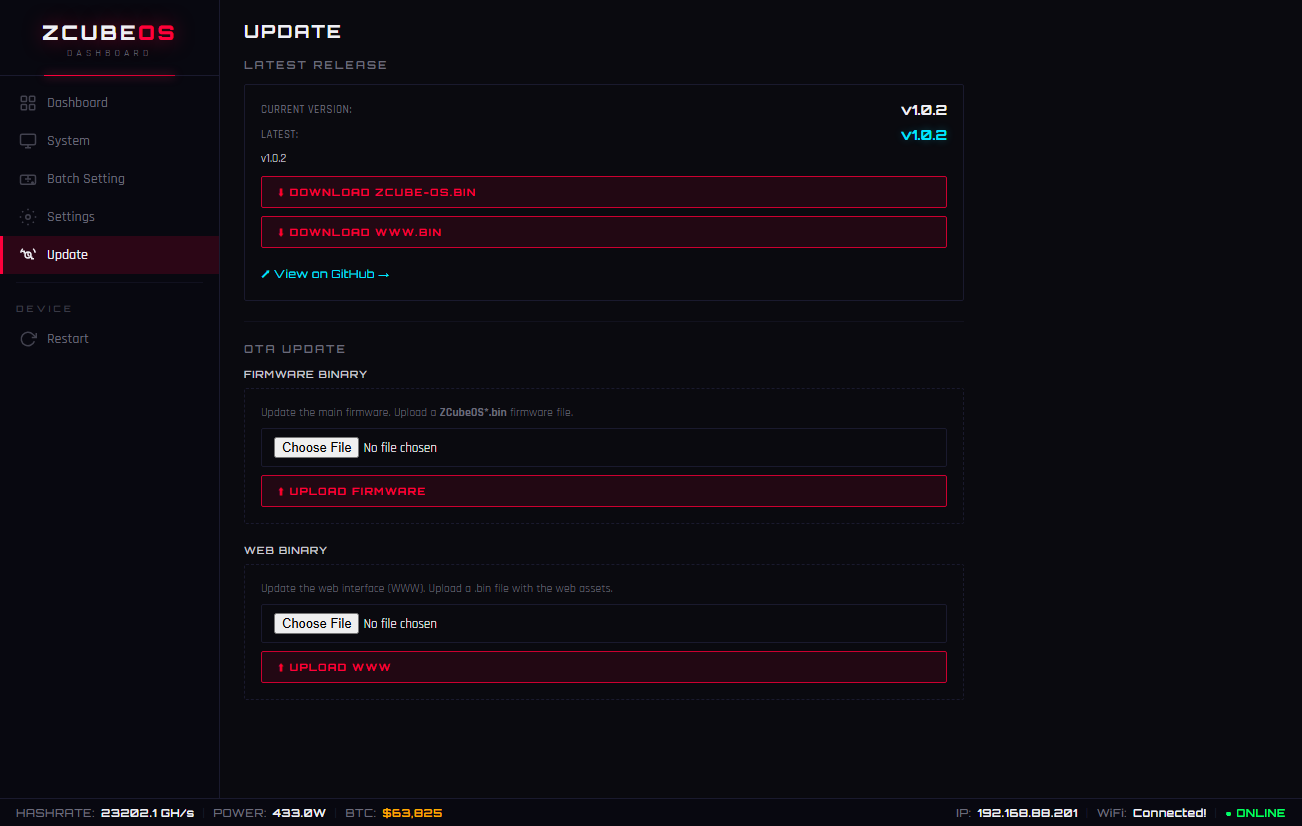
⚠️ DO NOT cut power during flashing — an interrupted write can brick the device. The OTA process averages ~1 minute. After success, the ZCube OS header will show the new version number.
| File | Purpose | Upload Via |
|---|---|---|
| ZCubeOS.bin | Main functional firmware (OTA upgrade recommended) | Firmware Binary → UPLOAD FIRMWARE |
| zcube-os-factory-v1.0.2.bin | Full factory image (recommended for first flash) | Firmware Binary → UPLOAD FIRMWARE |
| Web Binary (.bin) | Updates Web UI resources | Web Binary → UPLOAD WWW |
3.7 Restart:🔄 Reboot WatchDog
When Should You Use It (Typical Triggers)
-
✅ Right after finishing Wi-Fi provisioning (in some router scenarios, a Restart helps ZCube OS stabilize faster on the new LAN IP)
-
✅ OTA/Update complete (some builds auto-restart; if the page seems stuck, manual Restart is your safety net)
-
✅ After Batch Setting pushed new pool configs (miners may need their own restart; a WatchDog Restart refreshes the scan/connection state so Dashboard snaps back to a clean view quickly)
-
✅ A device in Dashboard shows "frozen/stuck orange" and you've confirmed the router & IP are fine — try Restarting WatchDog so it does a fresh discovery sweep (before you go resetting miners blindly)
-
✅ Changed Hostname and want to verify immediately that
http://your-hostname/resolves reliably
Safety Notes (Important)
-
⚠️ Do NOT unplug USB power during a Restart. A soft reboot is an orderly software reset — cutting power mid-sequence is what pushes it into undefined states.
-
If you're about to flash firmware via Update, don't manually Restart first — let the Update flow handle its own reboot sequence.
-
If WatchDog sits somewhere easy to knock over (prism facing up), avoid moving it during reboot — let it finish its self-check first, then reposition.
Restart vs. Yank-the-Cable: Which to Pick?
|
Action
|
Recommended?
|
Why
|
|---|---|---|
|
Menu Restart (Soft Reboot)
|
✅ First choice
|
"Clean reboot: services shut down gracefully, then spin back up — state stays consistent"
|
|
Unplug USB & replug (Hard reboot)
|
⏱ Last resort
|
Only if soft reboot hangs >2–3 min, page is totally unreachable, AND you've confirmed the power adapter/cable itself isn't the culprit
|


comments