Maximize your cryptocurrency mining experience with our advanced home miner -the Zyber series. Uniquely crafted by TinyChipHub, it is designed for efficiency, durability, and ease of use. If you are a new beginning, please kindly read this manual before use!

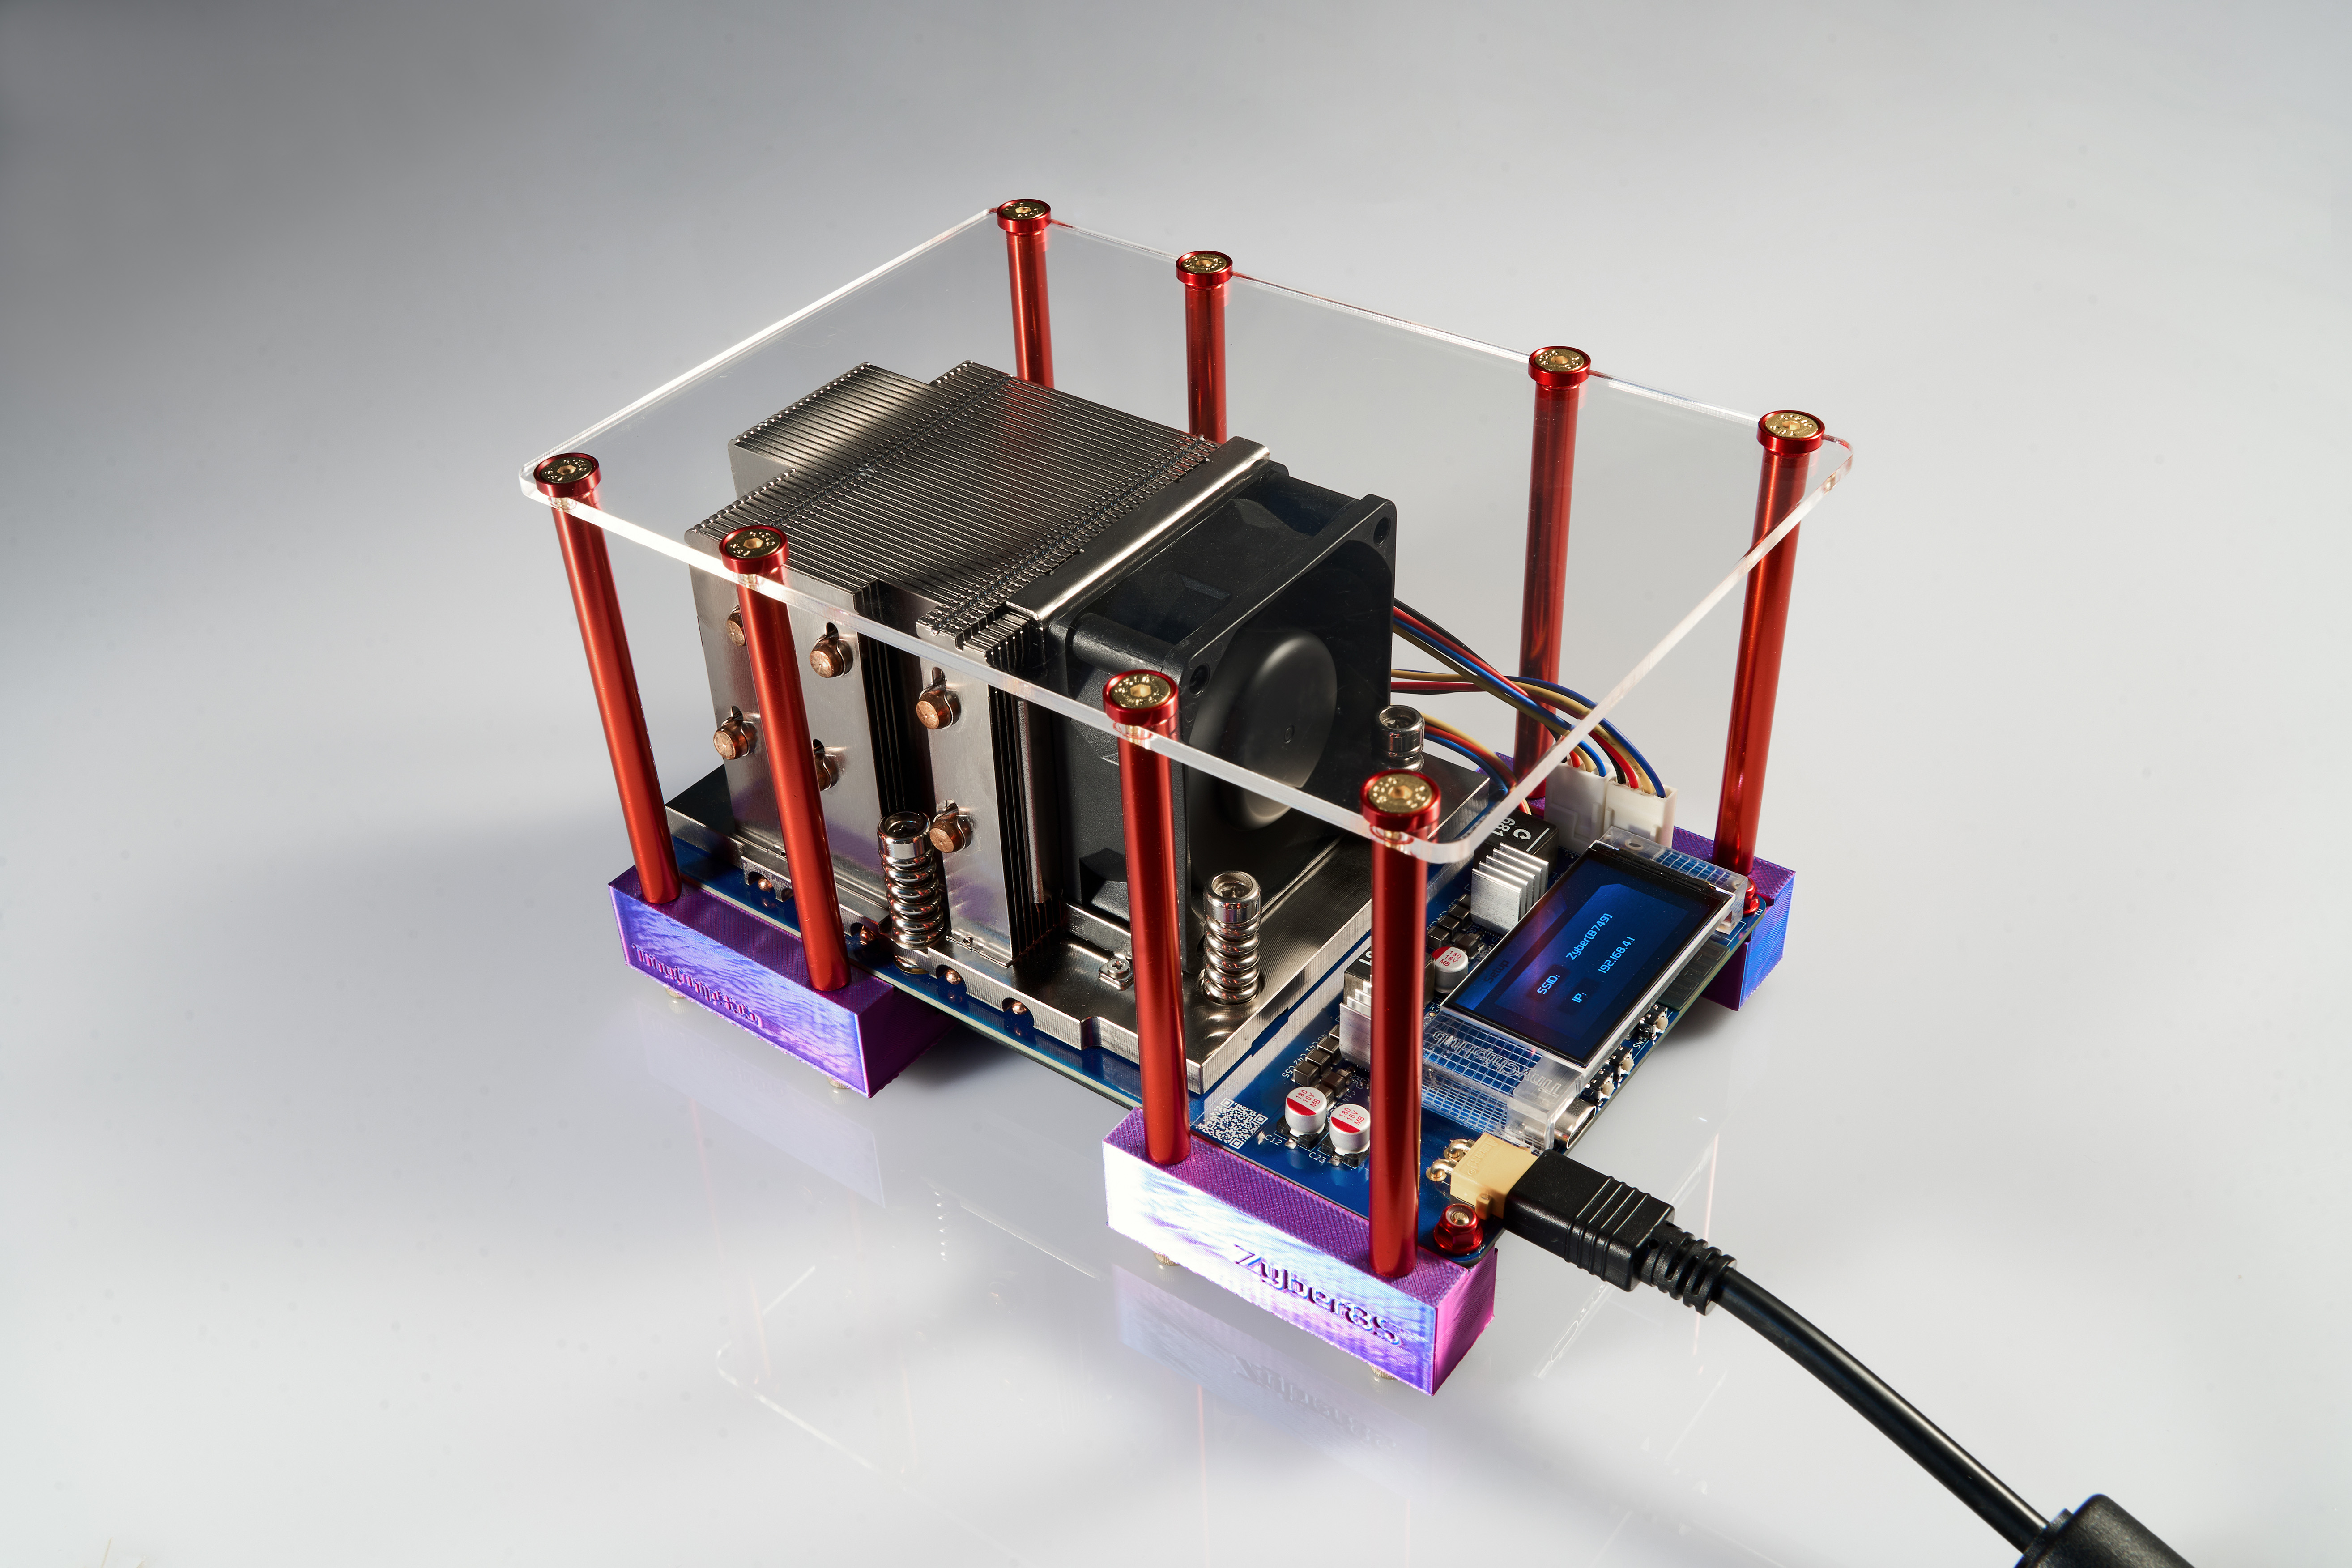
Ⅰ. Buttons and Ports
1. Power Socket: The power socket is polarized. Please check the polarity before plugging in to avoid damaging the plug. Then, insert the plug with one firm, swift motion to minimize the risk of arcing. Arcing can damage the board.
*Live Terminal Avoidance: NEVER touch exposed copper power terminals (12V-15A DC) when powered on. It's not deadly but still painful if your hand is wet. Wear insulated gloves during maintenance operations.
2. Fan Ports: There are two fans: one on top and one on the bottom. If you have previously unplugged it, please check the positions of the fan's interface. Ensure all four pins are properly aligned during reinsertion; incorrect connection may cause fan regulation errors and damage the control components.
* Fan Safety Protocol: Do NOT place your fingers on the fans. Keep your hair away from them as well. The fans will automatically start when the power is turned on.
3. USB-C Port: This is used for data transmission or connecting to a computer for flashing or firmware updating. When your system crashes and you can't access AxeOS, you'll need to use this port to connect to a computer for flashing purposes.
4. Buttons: There are three buttons under the screen:
- DISPLAY: You can wake up the screen by pressing the Display button. Pressing and holding the DISPALY button will turn off the screen manually. The screen will automatically turn off after a period of time to prevent aging (You can adjust the time in the AxeOS ”Settings” page).
- RESET: Restart your device. It is mostly used after saving some settings and applying them.
- BOOT: To change the status page on the screen: By pressing and holding the BOOT button, the Zyber will release its Wi-Fi network, allowing you to manually reconfigure the network settings. This feature is primarily used when connecting to an invalid network.
Ⅱ. Network Configuration
As the Zyber powers up, the screen will light up, and its WiFi module will automatically activate. This indicates that the device is ready for the next step of the setup process.
1. On your smartphone, tablet, or computer, open the settings menu and navigate to the Wi-Fi settings. In the list of available wireless networks, look for the network named "Zyber_XXXX" and connect to it. Once your device is successfully connected to the Zyber's Wi-Fi network, a captive window will automatically pop up on your screen.
* If you cannot search for the network named 'Zyber_XXXX' or connect to it but the pop-up window is not fully loaded, you are probably too far away from it. Please get closer and try again!
* If you have successfully connected to the Zyber network but the pop-up window doesn't appear, it's probably being blocked by your default browser. You can try using your phone or another browser(Safari, Chrome) to enter the default IP address 192.168.4.1 and access the configuration page.
2. Enter the desired device name in the "Hostname" field, click the magnifying glass icon on the right to search for available network signals or input the target Wi-Fi network name in "Wi-Fi SSID" field, then type the password in "Wi-Fi Password" field.
* Please verify that the Wi-Fi SSID and password are entered with exact case matching, eliminate the extra spaces as well, discrepancies will prevent connection!
3. At last, click "Save" and restart the device.
* Notice that The ESP32-S3 WiFi module can only receive 2.4G network signals,while 5G is not supported. Please check your router if you can't find an available wifi network.
If this screen appears, congratulations—you have successfully connected to the network!

Ⅲ. Pool Configuration
Now you can enter the IP address shown on the screen to access the AxeOS page of your device. You can check your status in the Dashboard and modify your miners here. Now please go to the “Pool Setting” and complete the pool configuration first:

1. Stratum Host: Enter the pool address you want to mine at. If you are new to mining and unsure how to choose a pool, you can find a guide here.
2. Stratum Port: A port number used for communication between your miner and the pool server. Normally, you can find this in the pool's documentation.
3. Stratum User: Enter your crypto wallet address here. Please ensure your wallet is compatible with the cryptocurrency you are mining. To identify multiple machines on the pool, append '.device_name' to your wallet address (e.g., wallet_address.device_name). This formatting does not alter the original wallet address or affect its functionality.
4. Stratum Password: Most mining pools do not require a password, so you can leave this field blank. If supported by the pool, you may try entering "diff=xxx" (e.g., diff=10000) to communicate with the mining pool and request a difficulty adjustment tailored to your miner's capabilities.
5.Fallback Stratums: This refers to backup mining pool configuration details. If the system fails to connect to the primary pool, it will automatically attempt to establish a connection with the fallback pool.
* The default Stratum configuration is Tinychiphub's test pool. We test every unit before shipping. You can modify these settings at any time.
At last, click "Save" and restart the device. If you can see the hashrate in the Dashboard page. Congrats! You are mining now! May the hash be with you!
Ⅳ. Advanced Settings
That’s so exciting that you’re mining now! But if you want to have more fun, you can click on the "Settings" page and see what’s interesting there.

1.Select Running Mode: Frequency and Core Voltage are the core configurations of the device, directly impacting the chip's hashrate and stability. However, coordinating the relationship between Frequency and Core Voltage requires experience and knowledge. We've pre-configured various settings for your convenience. You can choose directly according to your needs!
2. Enable Overclock Mode: You can explore custom combinations of Frequency and Core Voltage to tune your device and potentially achieve even better performance tailored to your specific environment. Click "Save" after changes and restart your device to take effect. Click the "Disable Overclock Mode" you can switch back to "Select Running Mode".
*Notice that custom settings can cause damage & system instability. Only modify these settings if you understand the risks of running outside designed parameters.
3. Flip Screen: You can flip your screen display by 180 degrees.
4. Invert Fan Duty Cycle: This option is enabled by default. If you disable it, the fan's airflow direction will reverse. Unless you have a specific reason or creative purpose, do not modify this setting.
5. Automatic Fan Control: Enable this option, the fans will automatically adjust their speed based on the voltage regulator and ASIC temperature.
*You can manually set the speed if you find them too noisy or want to cool the device further for overclocking. Setting the speed too low may cause overheating!
6. Upgrade Bar: You can check the current version of your device and upgrade the firmware here. For more details about firmware and updates, please refer to Instructions for Firmware Upgrading and Flashing
Ⅳ. FAQ Hub
This section primarily addresses issues encountered during usage. If you're a newbie seeking to learn more about the fundamentals of mining, please refer to Home Mining FAQ - Understandable Answers for Newbies (2025 Updates)
1. Can I mine other cryptos with the Zyber?
Yes! If you're tired of mining Bitcoin, you can also mine other cryptos encrypted by the SHA-256 algorithm. Simply research and identify the specific coins, then fill in the mining pool and corresponding wallet address to switch the cryptocurrency you're mining.
2. The Power and the Input Voltage is a bit lower than the labeled value - is this normal?
The power grid output isn't constant, and slight fluctuations are considered normal. Additionally, the device's settings can also influence its energy consumption.
3. Does this device support IPV6 and 5G?
The ESP32-S3 we use only supports IPV4 and 2.4G networks, but don't worry, IPV6 routers generally have a backward compatibility mode for IPV4. Mining does not require very fast internet speeds, and compared to 5G network signals, 2.4G offers stronger penetration and stability.
4. Miner fails to connect to the router or Internet access failure after router connection.
This Could be caused by some factors, kindly check them one by one:
- Network compatibility check: Confirm your router broadcasts 2.4GHz Wi-Fi signal (The ESP32 microcontroller ONLY supports 2.4GHz networks)
- SSID/Password Verification: Re-enter to eliminate extra spaces (common errors) and match letter case sensitivity exactly (e.g., "MyWiFi" ≠ "mywifi")
- Router Configuration Check: Ensure DHCP server is enabled (Path: Router Admin > LAN Settings); Disable MAC filtering and AP isolation in firewall settings.
- 401 Error: If you are using an Apple device, this is most likely due to the iOS system's security protocol blocking its connection to the network. Please use a non-iOS device to update the firmware. The latest version of the firmware has fixed this issue.
5. After completing the initial setup, can not access AxeOS through the original IP address.
When you click "Save & Restart" after configuration, your router will automatically assign a new dynamic IP address through DHCP protocol. Check the miner's display screen for the updated IP address (usually in XX.XX.XX.XX format). Type the new IP directly into your browser's address bar. Press Enter to reconnect to your Bitaxe dashboard
6. After entering wrong WiFi credentials or connecting to public networks requiring web authentication.
- Automatic Reset: Take the device to somewhere else outside the network signal's range. Wait 2-3 minutes for ESP32 to auto-generate reset hotspot (SSID: "Zyber_XXXX"). Connect to this hotspot via phone/PC and re-enter correct SSID/password in configuration portal.
- Manual Reset: Locate the “BOOT" on mainboard, press and hold it for 5 seconds to reset hotspot.
7. No response after connecting the device to the computer via a data cable.
If you need to flash the firmware and encounter a situation where the computer doesn't recognize the port (accompanied by persistent beeping sounds) after connecting the device via USB cable, you can enter Developer Mode using this button sequence: Press and hold the "BOOT" button first, then press the "RESET" button while continuing to hold "BOOT". After a brief pause, release the "BOOT" button first, followed by the "RESET" button.
8. Is it Okay to replace the fans? What's the specs?
Sure! However, The one on top is 12V-4PIN-6025, and one on the bottom is 12V-4PIN-8010. If you have previously unplugged it, please check the positions of the fan's interface. Ensure all four pins are properly aligned during reinsertion; incorrect connection may cause fan regulation errors and damage the control components.


1 comments