💡Tip: The data in the following article is for reference only. Please refer to the actual device operation and official support responses for details.
If you are running 7 Solo Miners at home, looking at each 0.91-inch OLED, you might think: having to remember IP addresses for each screen and switching backgrounds to check them is such a hassle! Sure, the LilyGO T-Display S3 offers a visual upgrade (from minimalist text to a graphical interface), making things at least look better. And now, WatchDog is here—a standalone physical dashboard designed specifically to solve the problem of not being able to view different home miners all at once.
1. Embedded Replacement: Bitaxe 0.91" OLED
A broken screen does not mean the machine is useless. The original 0.91-inch Bitaxe OLED screen is one of the most failure-prone components on the entire motherboard!
Good news: The Bitaxe OLED replacement itself is extremely low-cost, can switch between multiple text statuses, uses the standard I²C interface, and has pin definitions that fully correspond to the official hardware specifications. It is a direct drop-in replacement requiring no firmware changes or reflashing.
Bad news: Voltage fluctuations, aging solder joints, or the occasional power supply ripple—any one of these can cause your minimalist text status bar to stay black forever.
.webp?w=5000&h=2812)
The core operation involves three steps:
- ① First, confirm your Bitaxe model (Ultra / Gamma / Supra / Gamma Turbo, etc.) and ensure the OLED size is 0.91 inches.
- ② Power off the miner, then gently pull out the damaged OLED screen from the Bitaxe miner! Refer to the red box in the provided Bitaxe GT image; it indicates the 4PIN connector.
- ③ Align the replacement Bitaxe OLED screen with the 4 PIN connector and plug it in. Be careful not to press down on the screen during installation. Power it on to verify; if the screen lights up, you have succeeded.
💪 The positioning of this path is clear: original specifications, zero learning curve, purely a hardware repair action. If your Bitaxe Miner is just meant to run quietly without intervention, and everything except the screen is normal, there is indeed no reason to spend more money.
| Parameter | Original 0.91" OLED | Description |
| Resolution | 128 × 32 px | Monochrome display |
| Interface Protocol | I²C | SSD1306 Driver |
| Operating Voltage | 3.3V / 5V Compatible | Bitaxe onboard 3.3V |
| Connection Method | 4 Pin Direct Insertion/SMD | Drop-in replacement, no modifications needed |
2. Upgraded Screen: LilyGO T-Display S3
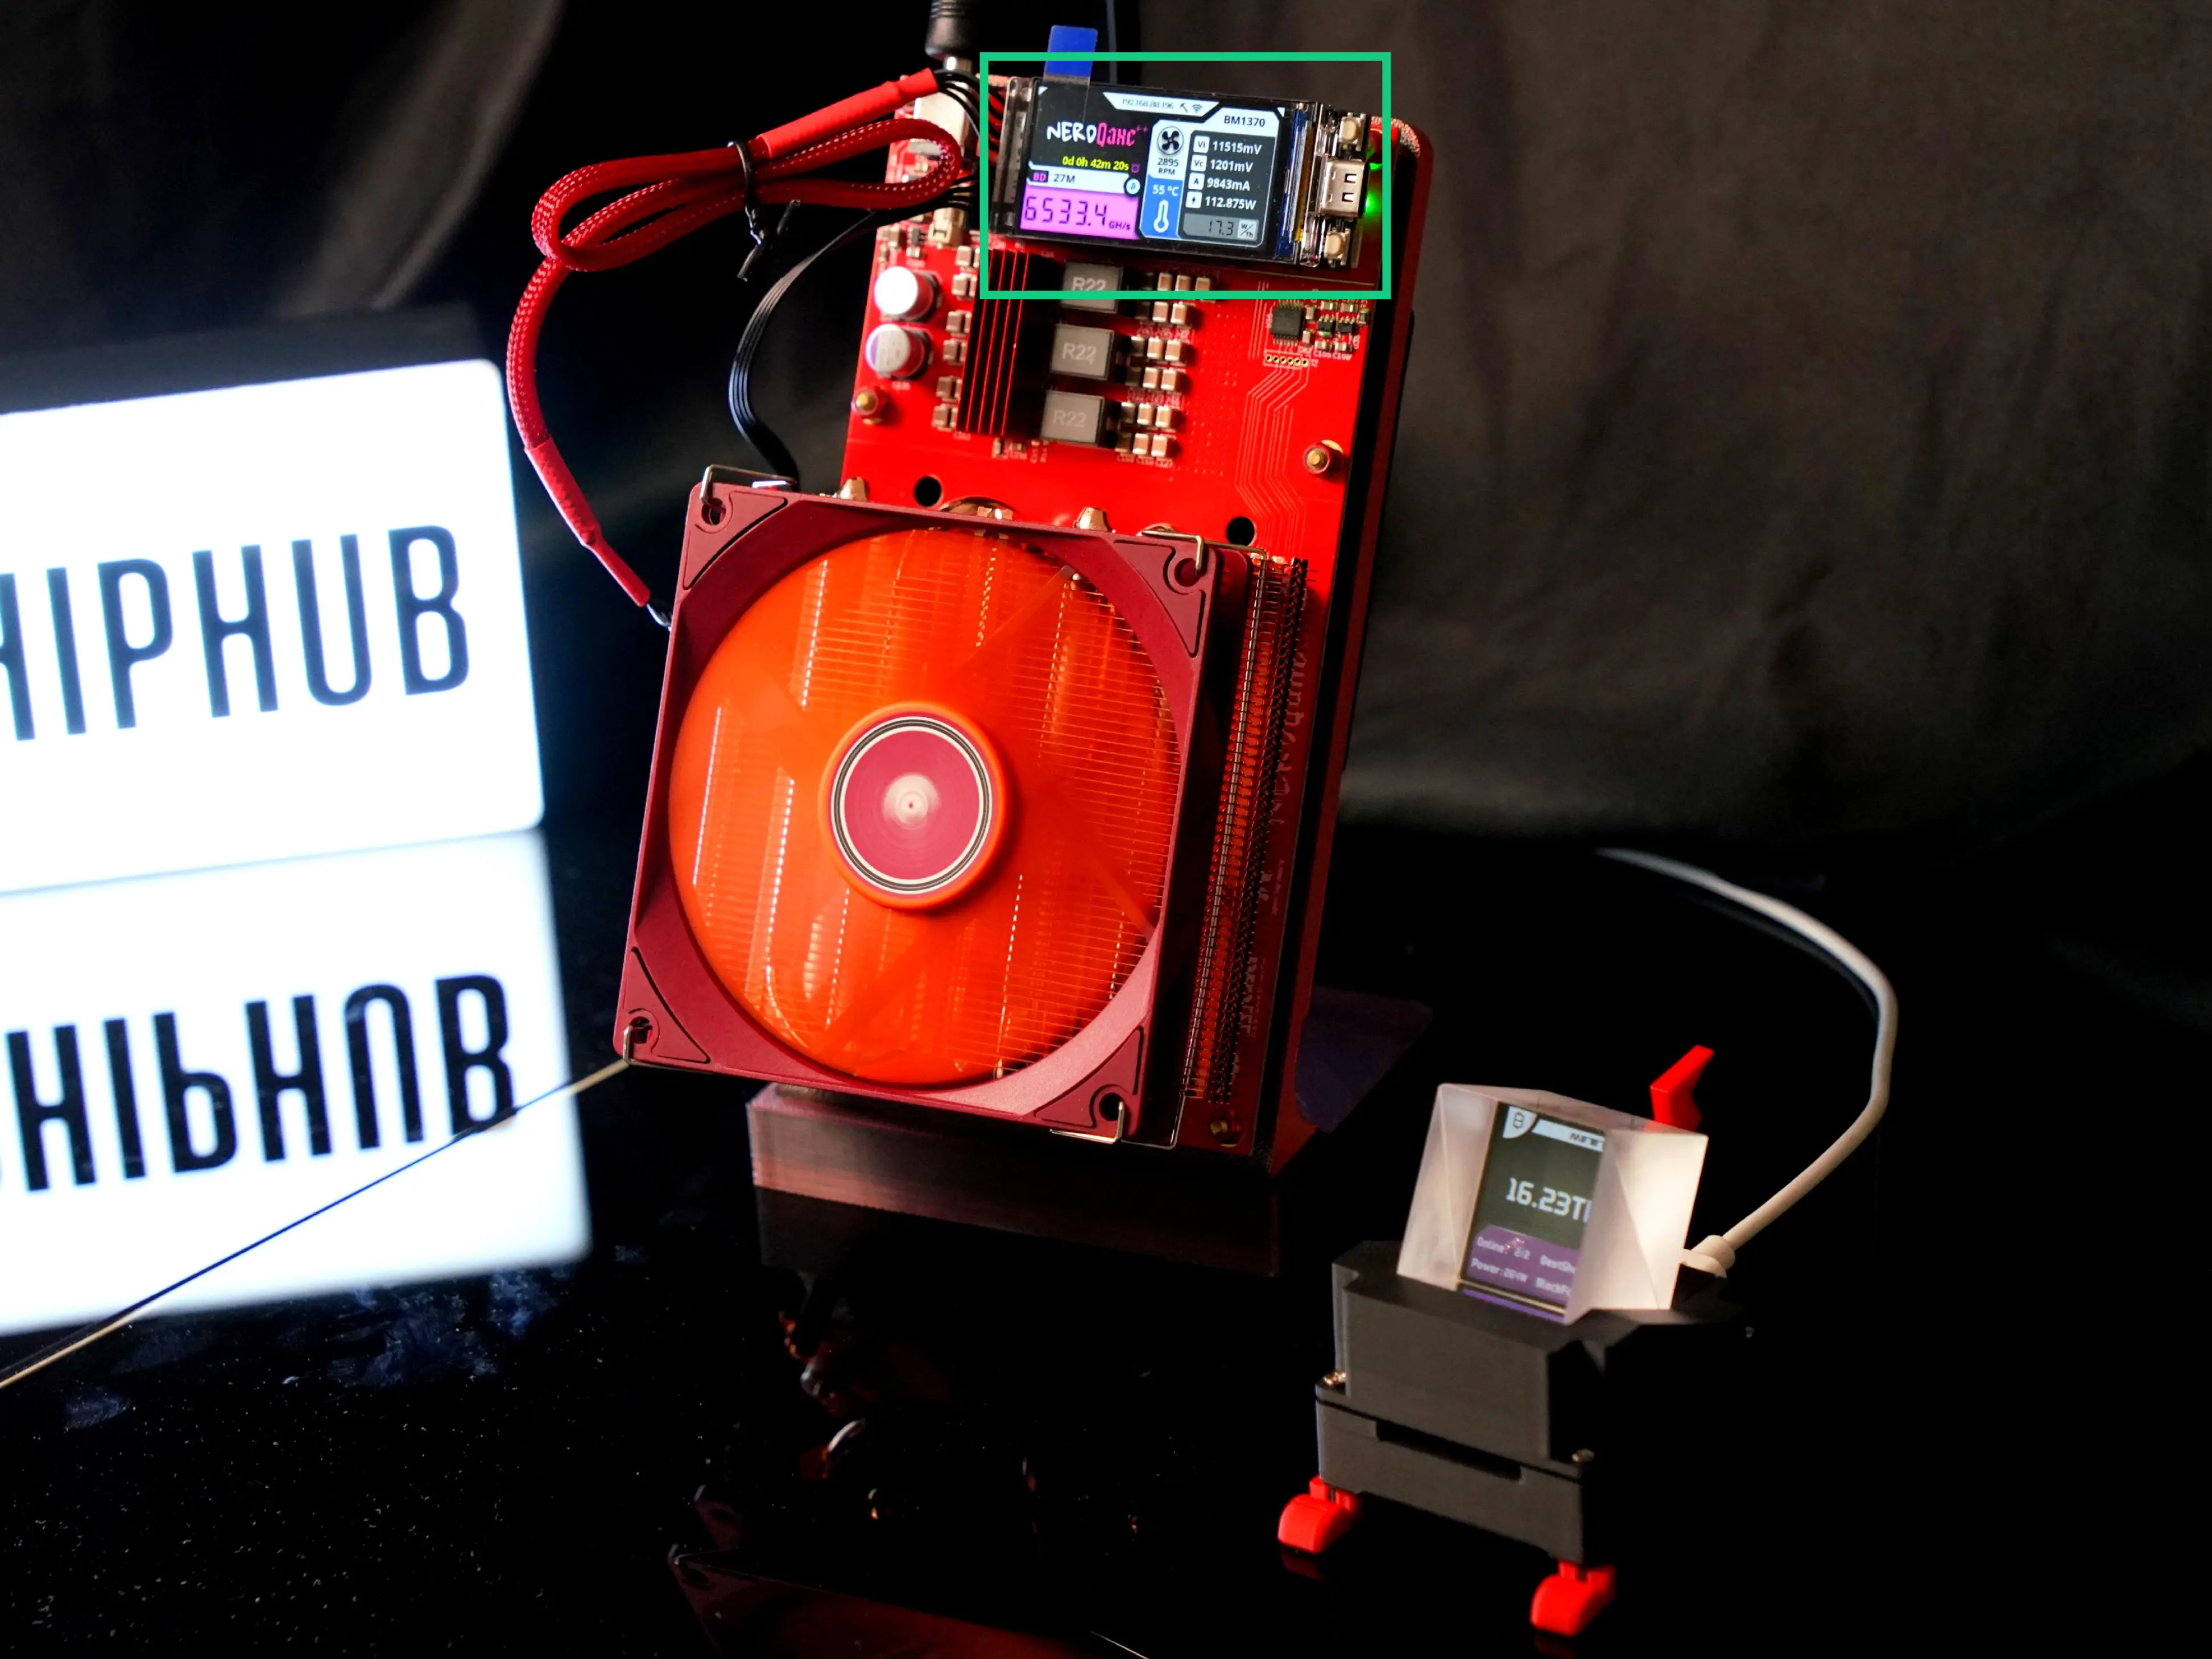
Tired of boring black and white text? The LilyGO T-Display S3 is your cyberpunk mod part. You might want to try the LilyGO T-Display S3 found on Nerd Miners—that upgraded screen that catches your eye with its novelty. The LilyGo T-Display S3 (H577) is a 1.9-inch ESP32-S3 color LCD module with pre-soldered pin headers, a resolution of 170×320 px, and high color saturation. It can directly provide real-time feedback on Nerd OS monitoring UI data, such as hashrate, temperature, energy efficiency ratio, etc. Here, not only is the page rendering more visually appealing, but it also supports switching between multiple UIs.
For miners who enjoy real-time monitoring of Share submission status, this smooth visual feedback is a dopamine booster. Tested uniformly on NerdQaxe++ devices sold by TinyChipHub Lab, after pre-flashing the custom firmware, you can render dynamic data right out of the box—it's plug-and-play!
➡️ The logic here isn't "replacement," but rather an upgrade from the Bitaxe series to the Nerd series, a further sublimation of the screen. While the above describes the advantages of this screen, it also has some shortcomings, such as:
- Nerd miners differ from Bitaxe miners; these screens leave the factory blank, meaning they require flashing. However, it is not difficult and takes about 2 minutes. See the tutorial below👇;
- Like the Bitaxe replacement screen, this screen requires connecting to the 4 PIN connector on the Nerdqaxe++ PCB to feed back data;
- One LilyGO T-Display S3 can only correspond to the data of one solo miner.
LilyGO T-Display S3: Complete Browser Flash Modding in Two Minutes
The screen leaves the LilyGo factory blank. The refresh process runs entirely within your web browser:
- Use a USB-C data cable to connect the screen to your computer. A charging-only cable will not work.
- Open Chrome, Edge, or Opera browsers. Firefox and Safari do not support the Web Serial API and cannot flash the ESP32-S3 motherboard.
- Put the motherboard into download mode: hold the BOOT button, briefly press and release the RESET button, then release the BOOT button. The motherboard will re-enumerate as a serial device via USB, allowing flashing.
- Launch the official web flasher tool to get the firmware:
https://shufps.github.io/nerdqaxe-web-flasher, suitable for NerdQaxe++. - Click "Connect", select the LilyGo motherboard, choose your firmware version, and click "Install".
- Unplug the screen, insert it into the miner's USB-C cable, and the dashboard will take over automatically.
The browser flashing tool is only used for initial flashing, recovery from bricking, or switching firmware versions.
❓ When should you choose this? You have a Nerd series Miner, you don't mind doing a bit of simple research, or you want to give your miner a "better-looking" desktop status screen.
⚠️ Note: Connecting the T-Display S3 requires ensuring the miner and the display board are on the same LAN segment. It is best to check your router settings beforehand.
3. Integrated Monitoring: WatchDog LCD
WatchDog's positioning is different from the previous two. It is neither a replacement screen nor a pure graphical display; it is a standalone physical monitoring node designed specifically to solve the problem of "I'm not next to my computer, but I don't want to SSH in to check." Place it next to your miners, connect it to the local network, and WatchDog will continuously poll one or more specified Solo Miners, displaying their status in real-time on its own screen. Of course, there are more ways to play waiting to be discovered, depending on future firmware upgrades. Yes, you heard that right: this product will receive functional maintenance and updates from professional engineers at TinyChipHub.
From a technical architecture perspective, WatchDog is essentially a pre-configured external Dashboard: it has a built-in Web UI accessible via a browser for configuring monitoring targets. You can understand it as having a relay function, directly accessing the screen panel data of the monitoring target without relying on a phone or PC; it supports multi-device monitoring and can keep an eye on 2–3 Solo Miners simultaneously, saving a lot of manual switching trouble for small-scale home mining setups.

For players running more than 2 Solo Miners simultaneously, WatchDog offers higher value density. You don't need to connect a T-Display S3 to every miner; one WatchDog can view everything centrally, reducing desktop clutter.
| Feature | WatchDog | Suitable Scenario |
|---|---|---|
| Number of Monitored Miners | Multiple Parallel | Simultaneous management of multiple Solo Miners (compatible with various miners) |
| Screen Type | Color TFT-LCD Dashboard | Desktop decorative art piece |
| Configuration Method | Web UI | No programming skills required, plug-and-play |
| Miner Requirements | AxeOS / Nerd OS / Zyber OS | Flashed firmware |
4. Comparison: Repair, Upgrade & Physical Apps
How exactly should you choose? Let's break these three things down across the dimensions of "Repair," "Upgrade," and "Physical Application." There is no absolute best; it completely depends on where your current needs lie.
a. Mining Hardware Vs. Desktop Art Peripherals
The 0.91" OLED is purely a mining accessory; it belongs to the Bitaxe screen and can only function as a screen whether installed or removed. The LilyGO T-Display S3, however, is a graphical interface; it is essentially an ESP32 development board that the community happens to use for miner monitoring, but you could also use it to run a weather display or a BTC ticker—its purpose is flexible. WatchDog is positioned closest to a consumer-grade peripheral product: ready to configure out of the box, dedicated to multi-machine use. It is designed for the specific scenario of miner monitoring, not a general-purpose display.
OLED Replacement Screen: Internal miner accessory, repair attribute;
T-Display S3: General-purpose development board, DIY attribute;
WatchDog: Dedicated monitoring peripheral, features can be iteratively updated, product attribute;
b. Minimalist Text Vs. Graphical Dashboards
The information density of the 0.91" OLED is a hard limit. At 128×32 pixels and two lines of text, fitting in hashrate + temperature is already the limit. Want line charts or status color blocks? No space, and very unlikely.
The T-Display S3's 170×320 ST7789 color screen can run much better-looking rendered data graphics. In theory, it can render animated graphical UIs, but you'd have to write it yourself or use community UI solutions, with a rendering performance ceiling of around 30 fps.
WatchDog's Dashboard comes with a pre-made graphical interface, featuring a gauge style and color status feedback. You don't need to write a single line of code, but you can DIY if you wish.
💪 Information Density Ranking: WatchDog Graphical Dashboard > T-Display S3 Custom UI >> 0.91" OLED Dual-line Text
c. Repair Hardware Vs. Productivity Tools
This is the most critical selection logic.
OLED replacement is a repair; the need arises because your miner is broken and you want to restore it to normal. This money is undoubtedly well spent.
T-Display S3 is an extension of productivity tools. It makes your miner status more data-visualized, an active upgrade. It involves a learning curve and DIY fun, but requires your time investment.
WatchDog is an efficiency tool. It reduces the action of "going to check the miner status." It falls under the category of "I know the miner is running, I just don't want to keep my browser open or check them one by one."
| Dimension | 0.91" OLED Replacement | LilyGO T-Display S3 | WatchDog |
|---|---|---|---|
| Primary Use | Hardware Repair | DIY Visual Upgrade | Multi-machine Physical Monitoring |
| Technical Threshold | Plug and Play | Requires Flashing Out of Box | Zero Programming, Web Configuration |
| Screen Resolution | 128×32 (Monochrome) | 170×320 (16-bit Color) | Color Dashboard |
| Miner-side Modification | Requires Soldering | No Motherboard Modification Required | No Motherboard Modification Required |
| Suitable Number of Miners | Single Unit (One Screen per Machine) | Single Unit (One Screen per Machine) | Multi-unit Parallel Monitoring |
| Usage Scenario | Screen Failure Repair | Desktop Aesthetics + Monitoring | Fixed Status Dashboard |
🔥 Ultimate Advice: Single machine + testing entry = OLED; Single machine + aesthetics + data visualization = T-Display; Multiple machines + efficiency priority + pragmatism + DIY + data visualization = WatchDog.


